Cricut Iron On Reverse Canvas Tutorial | Free Amazing Grace SVG
Recently I’ve been getting into reverse canvas projects!
In this post I’ll show you how to make this Amazing Grace reverse canvas project, and you’ll also be able to download the free SVG file for this project at the end of this post. If you like it, make it yourself!
For this reverse canvas project, I’m using Cricut Iron On and am pressing the well known line of John Newton’s great hymn, ‘Amazing Grace, how sweet the sound.’
How To Make A Reverse Canvas

Making a reverse canvas is easy, but it is not very quick! There are quite a few steps, but I think the result is worth it. Also, there will be fewer steps for you if you make this project, because I’ve designed the SVG for you!
Can you use iron on on canvas? Yes! And that’s what we’re doing. You can use iron on or vinyl on canvas for this type of project.
How To Make A Reverse Canvas
Here’s what you need for this project:
- Cheap stretched canvas
- Vinyl cutting machine
- White Cricut Iron On
- Cricut weeding tool
- Black paint for the canvas
- Acrylic primer & paint
- EasyPress, heat press or iron
- Teflon sheet
- Exacto knife
- Staple gun
- Sandpaper
1. Remove Canvas From Frame
Buy a stretched canvas – it doesn’t have to be a really good canvas or anything, I basically just bought the cheapest I could find for this project. Maybe though, a more expensive canvas would have a nicer frame?

Using an exacto knife (or something similar), cut the canvas away from the frame by cutting outside of the staples. Alternatively, you can use a staple remover, but this will take a lot longer without any added benefit.

2. Paint Canvas & Frame
Next you need to paint the canvas and frame. I applied two coats of basic black acrylic to the canvas, while I primed the frame and then applied two coats of a white semi-gloss water-based enamel – to make it nice and shiny! Use sandpaper to get remove any roughness from the frame before priming, and between coats.

3. Create A Design
Next, create a design (or download the free SVG at the end of this post!). I used this font from fontbundles.net to make my SVG.

4. Cut The Design
I chose white Cricut Iron-On for this project, but you can choose any colors you wish. Perhaps gold on black would look better? Or teal iron-on on pink?
You can also use adhesive vinyl for doing a reverse canvas, but I prefer the look of one that has been done with HTV and a heat press.

Place the Iron On vinyl onto the mat shiny side down and load the mat into the cutting machine. Before cutting, remember to reverse the design (select ‘mirror’ in Cricut Design Space) if using Iron On, and set your dial to ‘Iron On’.

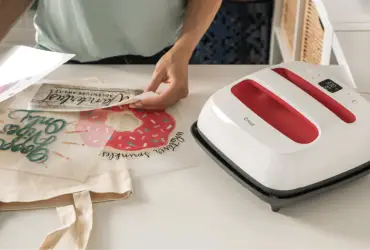
5. Weed The Design
Weed away the excess vinyl from the design. I used my Cricut weeding tool.

6. Position Transfer For Pressing
Get your heat transfer in just the right position before pressing it. I also pre-pressed my entire canvas first to make sure it was completely wrinkle free (and so it’s easier to attach to the frame later on).

You can use:
- your home iron – set dial to between cotton & linen
- the Cricut EasyPress – set to 330°F
- a heat press – set to 305°F
Check out these application instructions for more information. Remember to use a Teflon sheet to protect your project from the heat press device you are using.

7. Re-attach Canvas To Frame
Next you need to re-attach the completed canvas to the frame. I used a staple gun to do this because it allows for a tight canvas. You might be able to use tacks as an alternative to a staple gun, but it may look a bit loose.
Position your frame where you want it on top of your stretched canvas. Place onto a wooden chopping board.

Make small cuts around each of the four corners.

The back of your canvas should now look like the picture below. When you turn your canvas over, you will now easily be able to line up the cut corners of the canvas with the corners of the frame. Staple each of the four corners, then put more staples in the middle of each side. Add even more staples if you like, like I have, to make sure it’s nice and tight.

8. Trim Excess Canvas
Once the canvas has been stapled back onto the frame, you will need to trim off the excess canvas. Use your exacto knife or craft knife to cut around the outside of the staples.
Here’s what the finished back of the canvas looked like.

You could possibly use scissors to cut away the excess canvas from the back if you don’t feel confident using a knife.
A Completed Reverse Canvas With Iron On Vinyl
I’m really happy with the result! Here’s the completed canvas.

It’s going to look great on the wall!
Free Amazing Grace SVG

Click the button below to download the free Amazing Grace SVG cut file for use in Cricut Design Space.
Also see our list of the best free SVG sites. For more ideas, check our Reverse Canvas Cricut board on Pinterest. Let me hear about your reverse canvas projects in the comment section below. Thanks!
Pin this project for later! 🙂
(Please note: This post contains affiliate links. Read our full disclosure policy here.)