DIY Olympic Shirts – SVGs, Materials, and Tips!
The Olympic Games in Tokyo are finally set to begin July 23rd and run through August 8th. To get ready for the big event we used some classic blank T-shirts and Onesies® from Gerber Childrenswear and spiced them up for the games!

Olympic Shirt SVGs and Materials
For each design below you’ll be able to find out the materials I used, the source of the SVG file or image used, and any other tips that made the design possible. I hope they get your creative juices flowing ahead of a fun summer Olympic games!
If you’re in the market for kid-sized blanks going with Gerber® is a great option. Their shirts have a really soft feel, are well made, and won’t break the bank. When my first kiddo was born I really only thought of Gerber® as being a baby food company and the maker of the classic Onesie®. Boy was I wrong! Check out their website and you’ll be blown away by their selection of clothing for kids of all ages in fun prints and classic solids.

I find clothes to run a bit on the small side so I’d suggest ordering up a size. Plus, that way your kiddo will get to wear them a bit longer! Their t-shirts come in long or short sleeves and some are even already decorated with some fun sayings.

The Onesies®are so adorable. I love the Onesie® design with the shoulder cutouts to make it easy to get on over the head. They also make it easy if you’ve suffered the unfortunate blowout and need to pull the bodysuit down over their shoulders and hips.

For these shirts I used a combination of heat transfer vinyl (HTV) mostly from Heat Transfer Warehouse and Koala Transfer Paper along with my trusty heat press. You can alter the colors and size for any image to make it your own! In each design, I’ll share the source of the SVG or image, the materials used, and any tips that helped me along the way.
There are lots of great free SVG sites out there so poke around for more Olympic-themed designs! I used my Cricut Maker to cut out all of the designs but any cutting machine should do the trick.
Inkjet Transfer Paper Designs

Whoa – inkjet transfers have really come a long way! I loved printing my own shirts back in college (hello campaign shirts for student body president). Back then the result was always a bit more DIY looking than I’d hoped and rarely lasted. That is not the case anymore! As you can see in the photo above the transfers look vibrant, crisp, and amazing. I’ll tell you just how to make it happen!
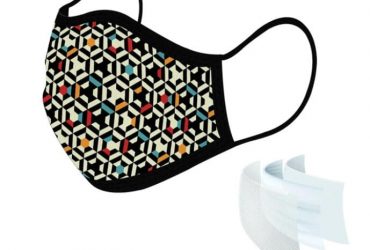
I used Koala Transfer Paper for dark fabric. It’s a great alternative to sublimation if that’s not an option. In this case, all of the shirts are 100% cotton so sublimation wouldn’t work. Think of this transfer paper as being a very thin layer of HTV that you can print directly on with your regular inkjet printer. After printing cut it out, peel off the backing, and add some heat!
Hot tip – if you’re going to purchase something from Koala Transfers do yourself a favor and use code heatpress at checkout to get 8% off!
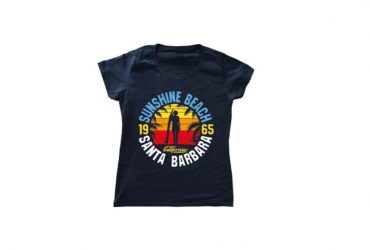
There will be tons of amazing surprise performances at the Olympics but I’m honestly most looking forward to seeing Simone Biles in the gymnastics competitions. She is so talented and inspiring! I found this image of Simone on Etsy – it’s actually marketed as a poster – but knew it would make an amazing shirt.

If only there were a donut-eating competition at the Olympics, that’s something I might be able to qualify for! Also – if we’re being honest babies might not be the ideal audience for the games, but they’d be in for a donut any day.
To make this shirt I used the same Koala Transfer Paper and this donut Olympic rings design. You could also create this look with layered HTV! To get the donut rings to cut perfectly I used the Print and Cut feature.
Metallic, Glitter, and Holographic HTV Designs

I love using metallic HTV because you really get a lot of bang for your buck. In the United States Olympic Team design from Etsy above I only used DecoFilm Soft Metallic HTV in red but it looks so fancy! If you’re using metallics the most important tip I can offer is to be patient and let the shirt or blank cool entirely before peeling off the carrier shirt. That way you’ll get a smooth image with no wrinkles or texture.

I’m a bit bummed all of the sparkles didn’t show up in the Simone design above. It’s really there, and it’s super shiny! Plus – Siser Glitter is my favorite of all the glitter HTVs I’ve tried because it is smooth to the touch. Sometimes glitter HTV feels stiff and scratchy but not Siser! Another reason I love Siser Glitter is that it can be cut on the normal Everyday Iron-On setting on my Cricut Maker. It’s quick and easy!
I went with alternating red and blue on the white shirt but I also think this stacked design with a retro vibe would look stunning in an ombre pattern. The Simone design is from Etsy.

I’m not sure what this year’s superteam of gymnasts from the United States will be nicknamed – but I know they’ll be incredible performers! These are the names of the six women who will be competing for Team USA.
I’m a sucker for the classic Helvetica shirt style but wanted to spice it up just a touch with some Holographic Pearl HTV in rainbow. It really does change color depending on the angle of the shirt and the colors it’s next to. I just used the text feature in Cricut Design Space to make this design.

Go for the gold, little baby! I simply added the ‘future olympian’ text to an Olympic Rings SVG from this bundle. ThermoFlex in Old Gold has such a nice feel to it – just make sure to let it cool completely before peeling to maintain its nice finish.
Layered SVGs in Solid Colors

Layering HTV is a great way to make professional-looking shirts at home for a really low cost. The Olympic rings SVGs were from this Olympic bundle – I thought the hearts were so cute for a little babe!
To make sure the layers/rings turned out even I started with the black ring first. Then I worked my way down and out from there. When you’re layering HTV always press each layer for just a few seconds. Then, at the end, do a final longer press. It’s also key to use a Teflon sheet or parchment paper to protect every layer from the heat press platen.

I wanted to do a classic Olympic rings shirt design but needed a way to make sure the red ring would still stand out. To take care of that I added the ring shape outline behind my rings. Cricut’s offset tool should do this but my Design Space was acting up. Instead, I just added circles and welded them together to make my own shadow.
Most of the time glitter, metallics, and holographic HTV have to be the top layer. If you haven’t worked with Siser Sparkle yet you’re missing out! It’s super shiny and has a really thin feel and it can be layered on the bottom of projects. As you can see it really made the solid colors of the rings pop! In hindsight maybe I should have ‘gone for the gold’ here but settling for silver isn’t too bad.
Classic White HTV Designs

You can’t go wrong with a solid white design on a brightly colored shirt! Team USA’s littlest supporter will look timeless with this Team USA design. This type of logo is also a good choice if you want it to be able to pass down to younger kids without it looking outdated.
For both of the designs in white, I used Cricut’s everyday iron-on. It’s a reliable vinyl that cuts and weeds easily.

Tokyo 2021 is sure going to be an Olympics to remember! The brushstroke font of the Tokyo logo turned out really crisp. For some of the very thin lines, I used a lint roller to help weed the tiny pieces away. We’ve got a lot more tips on weeding for you to check out too!
Ready for the Games!

Now that the shirts are on point – let the games begin! Would love to see what others have created for their Olympians. I can’t wait to see what memorable performances we get to witness over the next few weeks.