
DIY Doormat Step-by-Step Tutorial
Are you looking to make a super cute welcome mat to spice up your porch? We’ve got you covered. In this tutorial we’ll show you exactly how to make a custom stenciled DIY doormat for your front door. If you’ve been hesitating to take on this DIY project then this is a sign – GO FOR IT!

The cooler it gets the cuter everyone’s front porches seem to get, am I right? I love fall decor and fall doormats have become a trendy way to add a little spunk to a very functional piece. Plus, who knows – maybe your kids will be more likely to wipe their shoes if there’s a fun mat!
This is an easy DIY project for all crafters but I’ll admit to being intimidated before I made my first one. Keep in mind the finished product will never be examined up close by anyone but you! Laying out the stencil is the hardest part but peeling it back to reveal your beautiful design makes it all worth it!
DIY Doormat Supplies

For this project, you’ll obviously need to start with a blank doormat. We’re using a blank coir mat because they’re inexpensive and widely available. Plus the natural tan color is very visually appealing, especially in fall! Here are a few options to choose from (mine is from Target):
–Gorilla Grip Doormat from Amazon
–Room Essentials Doormat from Target

In addition to your blank doormat you’ll need the following:
- Cutting Machine – We used the Cricut Maker but an Explore Air 2 or Silhouette Cameo would work too
- Cutting mats (standard or light will both work)
- SVG cut file or text design for your mat
- Freezer paper by Reynolds
- Weeding tools including a spatula, scissors, and Exacto knife
- Cricut EasyPress or Iron (I used my EasyPress 2 and my EasyPress Mini)
- Foam paint brushes or daubers
- Indoor/outdoor paint
- Clear FlexSeal
Find Your Design or Cut File

Making your own DIY doormat is rewarding … and it’s definitely some work! Make sure whatever you choose to put on your welcome mat is something you really love. After all it’s a custom doormat so be picky about getting exactly what you want. Family names are a classic choice and make really nice gifts!
Additionally, the more detailed the cut will be the more challenging it will be to position the stencil. The design I chose definitely made it more challenging – something in a more blocky font would require a little less patience later on.

In this case, I chose an SVG that says “Bless This Mess” from Design Bundles. It felt like a perfect fit for my home because it’s got a seasonal nod to fall, Thanksgiving, and blessings while not being so over the top it’ll look out of place when I inevitably forget to swap it out until spring. And let’s be honest, the ‘mess’ part is accurate.
There are many other free SVG sites out there and you could always make your own design in Cricut Design Space. Etsy also has some fun SVG files specifically for doormats!
Prepping Your Design in Cricut Design Space

Once you’ve either uploaded your design or created it right in Cricut Design Space you need to prepare it for cutting. First, you need to make sure it’s the correct size. To do this I inserted a square, unlocked it, and made it the exact same size as the mat I am using – in this case that’s 18 inches x 30 inches. I changed the color to tan so I could really envision what the finished product would look like.
If you’re making your own design using text in Cricut DS making the mat in the background will help you determine the correct font size for your project.
Before doing anything else I took a second to ‘group’ and ‘weld’ my design. You’ll notice in the screenshot above that the original SVG was a ton of separate cuts. Welding it into one solid image will make the next steps easier and make sure it cuts exactly as you see it. Next, I expanded my design to be as large as I want it on the doormat. Finally, I deleted the ‘doormat’ background rectangle because I don’t actually want a big rectangle cut.
You’ll notice that neither the Cricut Maker nor the Cricut Explore Air 2 can cut a design as big as what I want for my DIY doormat (even the big 12×24 inch mat isn’t enough). Not a problem! Larger than mat projects are awesome and totally doable once you give them a chance, don’t be afraid!
In order to make this happen, I need to slice my design into two halves that will cut on two mats.
To cut my design in half I am going to use a rectangle and the ‘slice’ tool. First I inserted a square, unlocked it, and made it the size of roughly half of my design. You can do a vertical or horizontal rectangle, either will work. In this case, I chose a horizontal orientation because it meant fewer and easier points for matching up two halves of my stencil. If I’d chosen vertically it would have cut right down the middle of the ‘t’ in ‘this’ and that seemed more difficult.

Once I had my rectangle in place I selected both the rectangle and the “bless this mess” design I hit the slice button in the lower right corner. If your ‘slice’ feature isn’t available (it won’t work if it’s grayed out) you can try ‘welding’ or ‘attaching’ just your design to see if that helps.

Next it’s time to separate all of your sliced layers. As you can see you end up with not only the original design pieces but also some extras. Just delete what you don’t want to cut, in my case the leftovers of the square and the gray top half of the design.

Now I’m ready to cut! You can see the top half of the design that will cut on my first mat and the bottom half on the second. These cuts are still large enough that I need to use my 12”x24” mats.

Cut Your Stencil

In my opinion freezer paper is the absolute best (and cheapest!) option for making stencils that are specifically for doormats. The coir bristles of the mat are challenging to work with when it comes to getting your stencil in place as you’ll see later. It’s difficult to get stencil vinyl to stick to the bristles but freezer paper will grab on just enough.

If you’re cutting with a Cricut Maker there’s actually a Freezer Paper material setting, so easy! On the Explore Air 2 you’ll use the dial to select the parchment paper setting. As for the Silhouette Cameo, use the following cut settings: Blade: 1, Speed: 3, Thickness: 2.
I used scissors to roughly cut two pieces of freezer paper the size I’d need for each stencil. Then I mounted the freezer paper with the shiny side touching the mat so I wouldn’t need to mirror my design and so it would be easier to peel off the mat. Finally, I used my Speedball brayer to get rid of any bubbles without scratching up the freezer paper.
For this project, you should use the fine point blade in clamp B on your Maker or Air 2. I loaded my mat and pushed ‘go’ on my Cricut machine, then repeated the process for the second cut.
Position Your Stencil

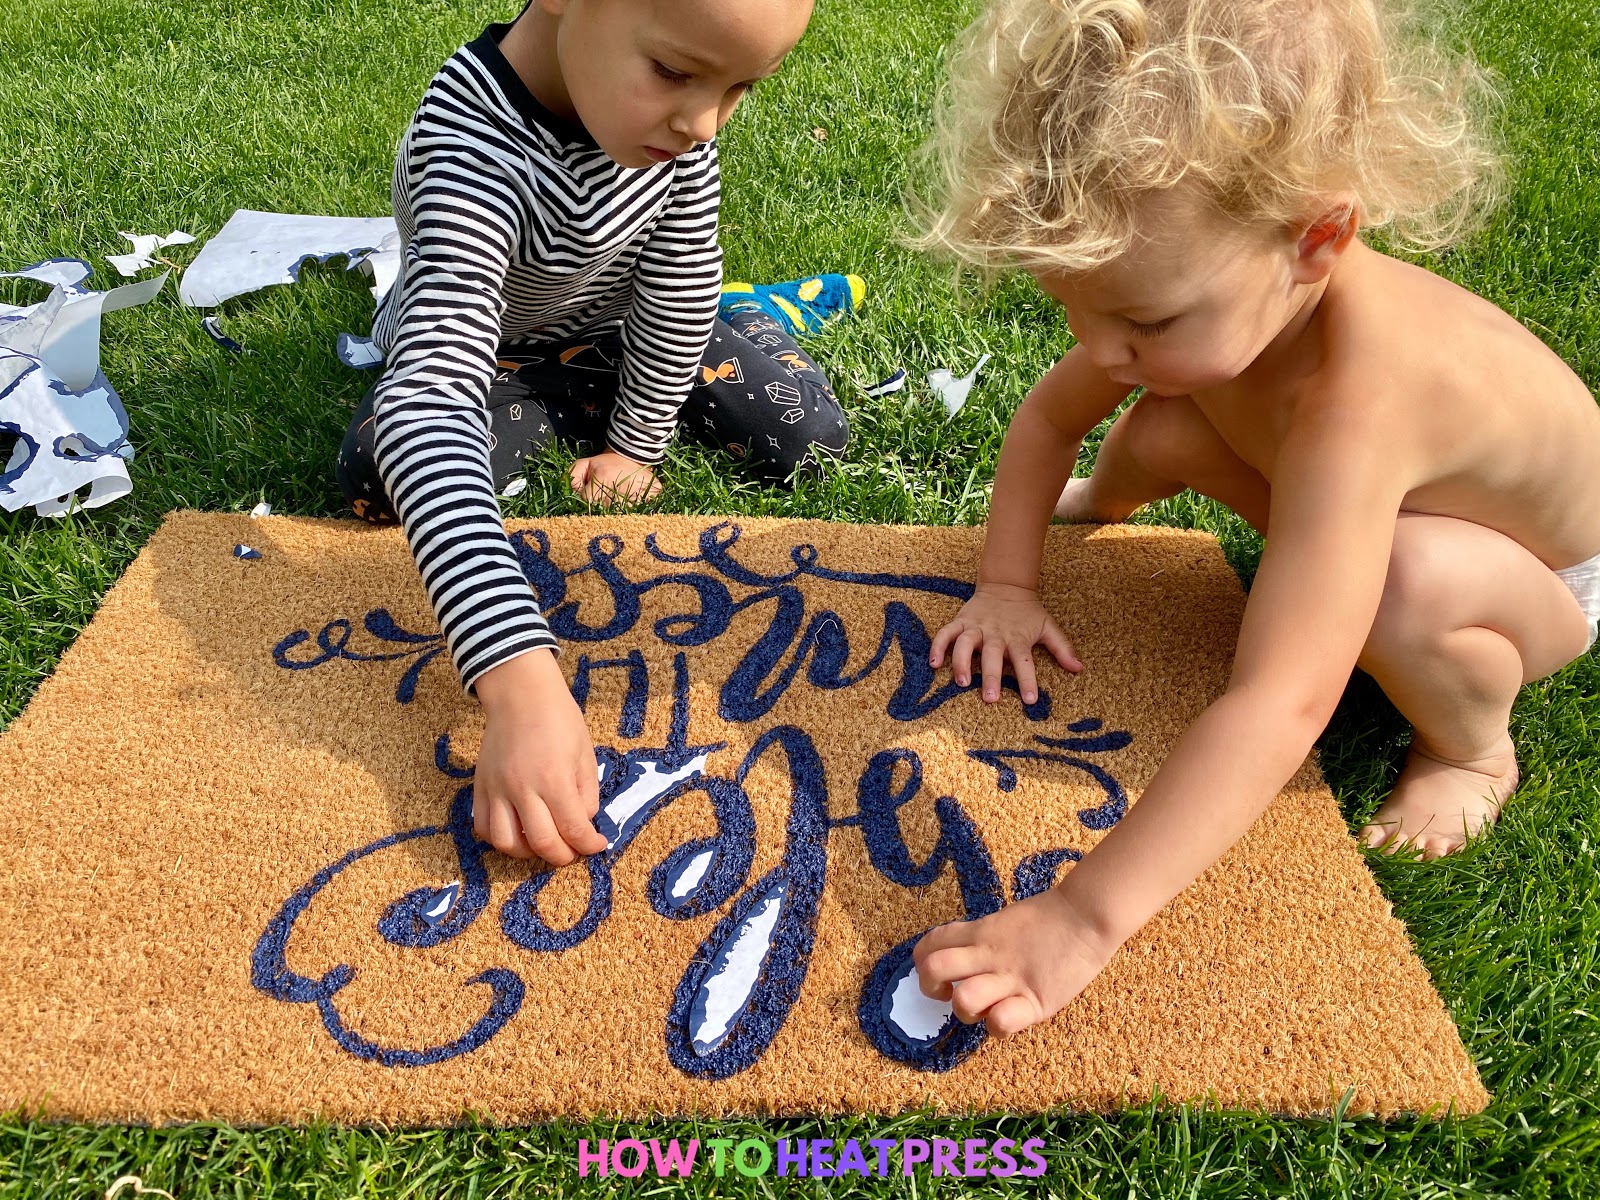
The stencils are big and I honestly asked my husband for an extra set of hands to help remove them from the mat. I always try to peel the mat away from whatever I’m cutting to avoid curling my finished product. As you can see I was carefully pulling the stencil down as he lifted the mat away.
When you remove your stencil from the mat you’ll leave behind the shapes that fill letters like ‘o’ and ‘e’ or in this case a lot of other letters too! Just leave them on the mat for now – once you have your stencil in place you will add them back in.
As you can see the paper will be a bit curly and you may be thinking ‘how am I going to paint that?!” This is where the magic of freezer paper comes in! When you add heat with your iron or EasyPress the paper will both flatten and gently adhere to the coir doormat. It also won’t leave a single bit of residue behind when you peel it away after painting!
Wondering if you should just try stenciling your DIY doormat with Cricut Stencil Vinyl or heat transfer vinyl? Just don’t. The main problem with both of these is that you can’t use transfer tape like you normally would because the adhesive vinyl won’t stick well to the coir texture of the mat. If you used HTV you’d have a hard time removing the stencil after it was painted. Finally, forget about cardstock as it won’t stay in place as easily as the freezer paper.

I set my EasyPress 2 to 315°F and pressed the stencil using medium pressure until I felt good about its placement and attachment. Please note that it’s not going to be stuck very well so be careful if you have to move your mat once you’ve put the stencil on.

Lining up the bottom half of the stencil was honestly the most difficult part of this whole project.
Trim your stencil so that you’ve got about ¼ to ½ an inch left beyond where the cut line is. This will make it easier to line up the two halves of the stencil without a bunch of loose pieces hanging off the edge.

I used my EasyPress 2 to adhere the bottom half of my stencil to the doormat and to the top half where the stencils overlapped. There were some problem areas for sure so don’t jump ship if yours doesn’t look perfect! First, I needed to cut the spots within each letter where the stencil overlapped but paint needed to go. I did this with scissors and an Exacto knife. Next, some of my letters in the word ‘this’ just looked like a mess and needed some serious attention.
Know that repairing your stencil is easy in case it rips or doesn’t line up well. Make sure to look closely so you can see my patches! In the picture below you can see how my ‘s’ really didn’t line up at all. Because the design itself is whimsy and the font is playful I didn’t stress and just added a few patches. Another reason freezer paper is great for making stencils is because it will glue to itself when heated. I cut little pieces to use as patches to reshape the letters how I wanted them and used my EasyPress Mini to attach them.

Finally, I went back to my mats and grabbed all of the shapes that belonged in the letters and swirls. The EasyPress Mini was the perfect tool for attaching them to the doormat. I set it to the hottest setting and used medium pressure for 5-10 seconds each.
With my stencil in place I’m ready to paint!

Paint Your Stencil
To paint the doormat you’ve got a few options.
-Spraypaint
-Outdoor acrylic paint
-Indoor/Outdoor paint

For this project, I chose to use this indoor/outdoor paint from Martha Stewart because it was what I had on hand (and I got it on clearance at Michael’s!) I actually really liked that it was a navy blue – the shade is actually called ‘ink’ – instead of the black you see on most doormats. To me it makes it look more ‘custom’ and unique than what you see at most stores.
If you choose to spray paint you’ll need to mask off the rest of the mat. You could easily use more freezer paper and a heat press or some painter’s tape.

To apply the acrylic paint I used foam brushes. I started with a small dauber but found it to be too hard to get the paint exactly where I wanted it. I switched to an angled rectangle brush that offered a bit more control. In hindsight, the circular dauber would have been fine if I’d had the courage to add more paint.

Know that your paint will not seep under the stencil much if at all because of the texture of the coir. It really can’t ‘flow’ under there so don’t be shy when adding your paint. I did two coats about two hours apart. The first coat I did working from the bottom of the mat and for the second I flipped the mat around and worked from the top to try to get good paint coverage.

Peel Your Stencil
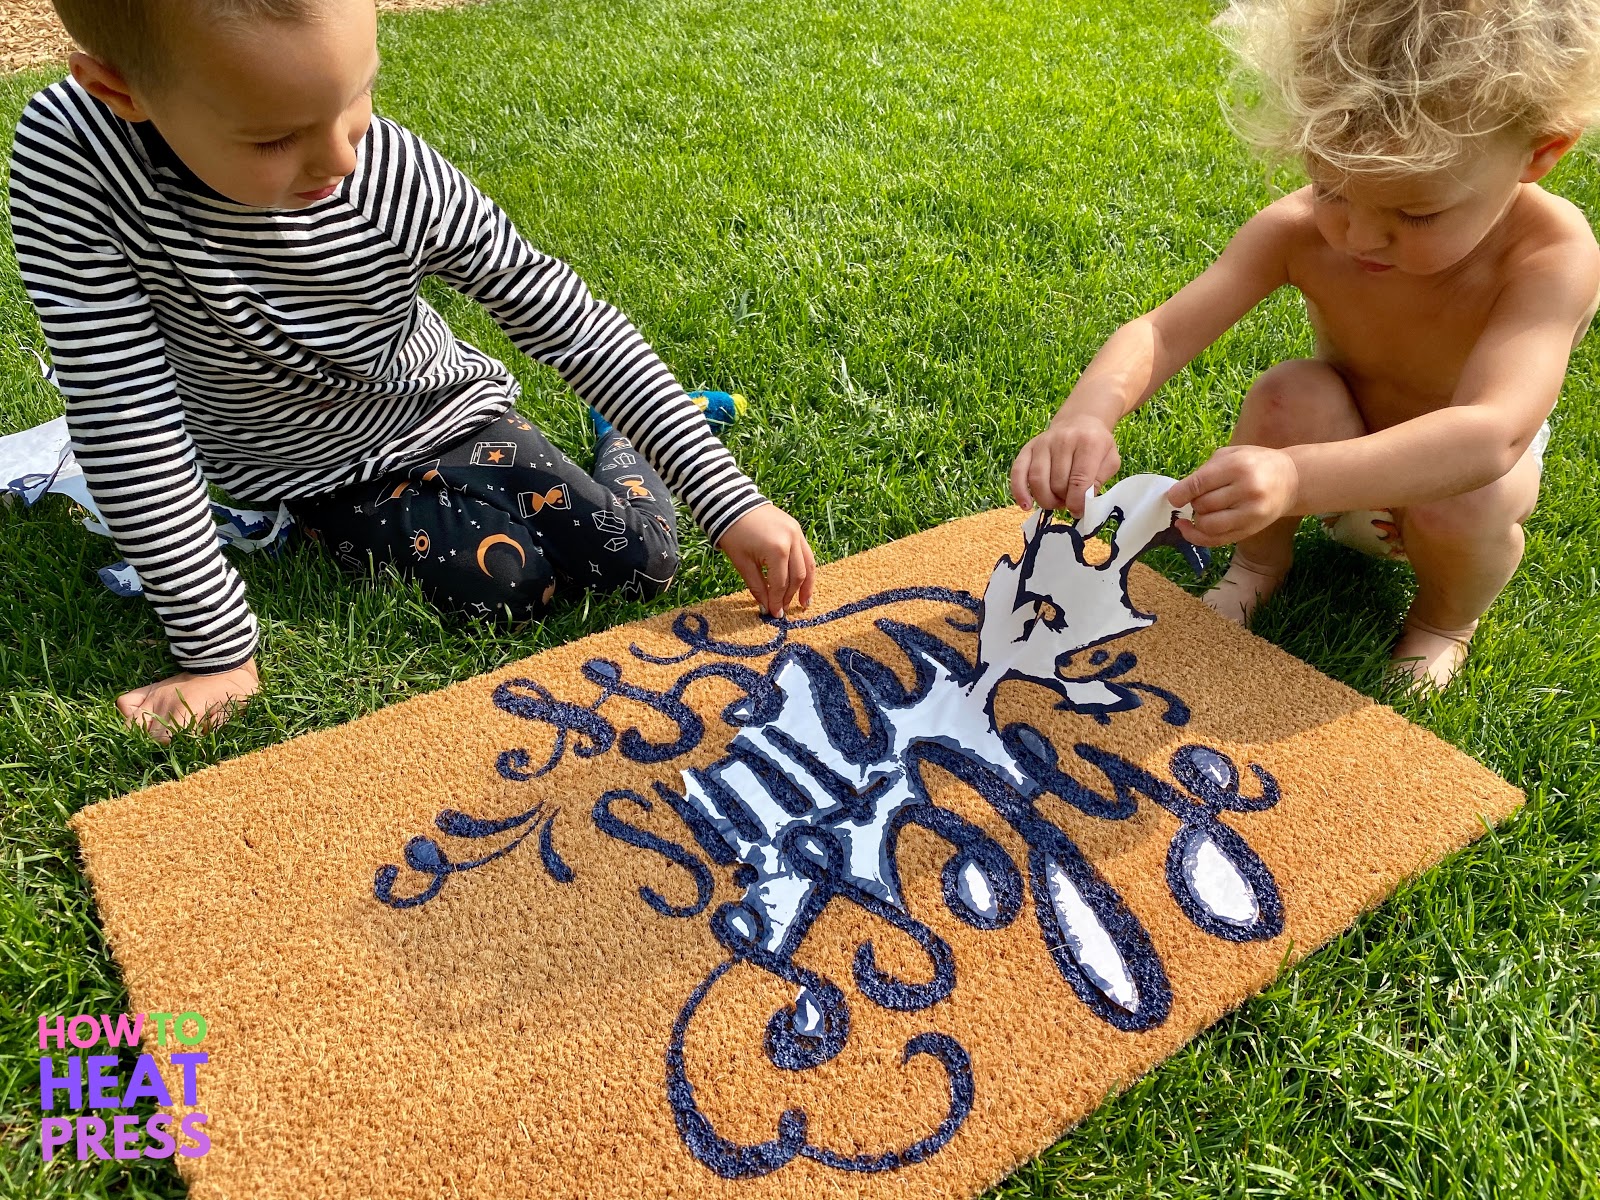

I let the mat dry overnight with the stencil still on. In the morning I enlisted my little helpers to peel back the stencil. It was so exciting to see the finished product! I honestly don’t know who was more amazed, the dudes or me, but the lines came out perfectly. The paint didn’t bleed at all because the bristles of the mat keep it all in place. Even the thinnest lines came out beautifully!

Seal Your DIY Doormat

If you’d like to make your mat last a bit longer you can give it a good coat of FlexSeal on top. Make sure to do this in a well-ventilated area with proper personal protective equipment and put it on top of a piece of cardboard or butcher paper. This is definitely an optional step but it can be worth it for making the mat last.

DIY Doormat FAQ
How long will a DIY doormat last? If you’re using a coir bristle mat the design will probably look good for at least 6 months to a year. A big reason these mats are cheap to buy is because they don’t last forever. The bristles actually breakdown, not the paint.
How do I clean a DIY doormat? You don’t need to be especially gentle when it comes to cleaning your doormat, especially if you sealed it. Shake it out, run a vacuum over it, hose it down if need be.
How long does it take to make a DIY doormat? Honestly, this isn’t a ‘quick and easy’ project. Plan on spending at least an hour getting the stencil cut and in place plus the time for a couple of rounds of painting and drying.
Take Pics of Your Cute Doormat!
You’ve earned it! Be proud to show off how amazing your finished product turned out. Give yourself a pat on the back because you’ve seriously upped your home decor and crafting game!
We’d love to see what you create in the comments and feel free to ask any questions about the process. Let us know what other decor ideas you’d like to see us create!
(Please note: This post contains affiliate links. Read our full disclosure policy here.)

Nevermind… I just went back a read again and found it. 🙂 Thank you!!
Does it matter what side of the freezer paper goes down on the mat?
Sounds like you figured it out! Hope you liked how your stencil turned out, Kelle!