
How To Use Cricut Print And Cut With Printable Vinyl – DIY Stickers!
Without a doubt, Cricut Printable Vinyl is one of my favorite products.
I mean, how cool is it to make your own stickers?!
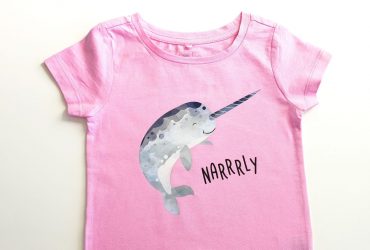
I’ve been busy making some vinyl stickers using the Print and Cut feature on the Explore Air 2. I even made some printable vinyl stickers to decorate my Cricut machine!
Cricut Explore Print And Cut Stickers

In this post, I’ll show you how to make your own stickers with Cricut, including:
- How to upload basic images for use as print and cut images
- How to use Cricut Printable Vinyl
- Some Cricut Printable Vinyl project ideas (including decorating my Explore Air 2!)
- Tips for finding images to make your own stickers
- How to change a single-layer SVG into a print-then-cut
- How to change a multi-layered SVG into a print-then-cut
While I’m using my Air 2, if you’ve got a Cricut Maker, you can (of course) do this project as well. Silhouette also has their own range of sticker paper & printable vinyl.
Cricut Printable Vinyl can be purchased here on Amazon or here at Cricut.com.
All of the pretty clip art pictures that I’ve printed and cut into stickers are from Creative Fabrica. I’ll link to the individual files throughout the post.
How To Use Cricut Printable Vinyl
1. Create a new project, click ‘upload’ and then ‘upload image’.

2. Click ‘browse’ and select the image you would like to upload. click ‘open’ and then ‘continue’. For this project I’m using a set of ice cream clipart. I think they are so cute!

3. Select the image type. If you’re making stickers with images that are anything like mine, most likely you will need to select ‘complex’. Click ‘continue’.

4. If uploading a JPG image, you can either keep the background (and your sticker will be a square shape), or you can remove it (and your Cricut will cut out along the outside edge of your image). To remove the background, use the wand tool and click on every part of the background until it is replaced with a grid pattern.
Here I’m uploading a PNG image, so the background is already removed, and my sticker will be cut out along the edge of the image. You can also remove anything you don’t want as part of your image.

5. Now save as a print then cut image.

6. Complete the above process for all the images you would like to print and cut with Cricut. You can see in the screenshot below that I’ve uploaded quite a few! Once you’ve uploaded them all, select them and insert them into your project.

7. Here are all my images. I’m going to play around with what size I’d like them to be, and I’ll duplicate some so that I’m filling up the entire page of vinyl.

8. Once you’ve sized your images and you’re happy with how they look in mat preview, you’re ready to print. Click ‘continue’.

How To Print On Cricut Printable Vinyl
9. Click ‘send to printer’.

10. Choose your printer and make sure the bleed is on (this will give a more precise cut). Click ‘print’.


This is the Cricut Printable Vinyl I’m using for this project.
You can easily tell which way to put the vinyl into the Printer. The front is plain white, while the back has a backing paper with a grid pattern.

To use printable vinyl you must print with an inkjet printer. Here I am printing out my stickers. I use the Epson WorkForce 2630.

How To Cut Cricut Printable Vinyl
11. Now it’s time to cut them out. To do this you’ll need to set the dial on your Cricut Explore machine to ‘custom’ and click ‘browse all materials’. Type in ‘printable’ and printable vinyl will appear. Select it and click ‘continue’.

12. Place your printable vinyl backing paper side down on your Cricut mat. I used my green standard mat for this project and had no problems at all (though it isn’t very sticky from lots of use!). Load your mat into your machine and press go.

The machine will take a reading of the entire mat, so be sure there’s plenty of room around your machine. It will then scan several different points of the outside black box, so that it knows exactly where to cut around the images.

Here they are all cut out. In the photo below you can see the bleed around the edge of the images which allows for a more precise cut.

I loved the ice cream stickers so much that I actually print and cut another sheet.
I also cut out two big flower arrangements to decorate my Explore Air 2. If you’d like to check out the flower images for yourself, they are available for purchase here. Creative Fabrica have a ton more floral images as well, so take a look and find your favorite! And the set of adorable woodland animals is here.
My toddler loves these new stickers, which are now in her reusable sticker book (we’ll see how long they last)! I love how the printable vinyl stickers can easily be re-positioned from page to page!

Decorating My Cricut Machine
Here’s one of the floral arrangements I’m putting on my Cricut Explore Air 2. It was easy to peel off the backing paper and place it on my Cricut – no transfer tape needed! Though, you may want to use transfer tape for very large projects.
How beautiful it is! However, if you look really closely, you may be able to see some very faint lines. This is a sign that the print heads on my inkjet printer needed cleaning – a little annoying, but I still love it!

Okay, so now I can’t stop looking at my Cricut!

Here’s the one I printed and cut for the top of my Cricut.

I also decorated a notebook with some of the ice cream stickers. But you could use Cricut Printable Vinyl on storage containers, vases, furniture, boxes, school stationery, walls, and so much more!

To make the ice cream stickers I had to upload each ice cream image individually. Later, when I was making the woodland animal stickers, I found out that Creative Fabrica also has clip art sets where all the images are in ONE PNG image file! So it uploads to Cricut Design Space as ONE image, and is all ready to go! That saved me a lot of time!

Barely any work involved at all…and these would make cute wall decals in my toddler’s room!

Next up I’m going to show you a couple tips on how you can easily change single and multiple layered SVG files into print-then-cut images.
How To Change A Single-Layer SVG Into A Print-Then-Cut
To change any single layered SVG cut file into a print-then-cut image, click the cut symbol in the layers panel and then select print from the options that appear.

You will see that the cut symbol has now been replaced by a printer symbol.

How To Change A Multi-Layered SVG Into A Print-Then-Cut
Now let’s talk about SVG’s with multiple layers. Here I’ve got a koala SVG that has several layers. You can see all the layers in the panel to the right of the canvas.
To change any SVG like this into a print-then-cut image, all you need to do is select your image and click ‘flatten’. This flattens all the layers of the image (you probably guessed!) down into a single-layered image for print-then-cut.

Easy peasy! Now it’s a print-then-cut image – it’s got a printer symbol now instead.

Where To Buy Cricut Printable Vinyl
I hope you found this tutorial helpful and that you have picked up a few new Cricut tips and tricks! I also hope I’ve inspired you to try out Cricut’s print-then-cut feature, and all the cool possibilities it gives for crafting!
Buy Cricut Printable Vinyl:
Or, test out Expressions Vinyl’s printable vinyl!
What have you made with print-then-cut? Leave a comment below!
Pin this post! 🙂
(Please note: This post contains affiliate links. Read our full disclosure policy here.)

this has been a very interesting email. Thank you for sharing.
Great to hear Vicki!
Would these printable stickers fade or smear ink at all? I’m wanting to use them for product labels, and I don’t want them to disappear after a while… Thanks for this.
Hi Jennifer, no they won’t fade or smear! This post was made almost a year ago and I still come across these stickers around the house on different items the kids stuck them to – and they’re all still in good condition. In fact I just realized I have one of them on my computer that I’m so used to I don’t even see it anymore!
Do you ever use laminate vinyl on top of the printable vinyl before you cut?
Hi Alissa, no I have not done that before. Would that be to protect it a bit more?
does this work on shirts too?
Hi Wala, no this printable vinyl is not for shirts. You could check out this iron-on transfer paper for that sort of thing.
I can’t get my images to cut around them – they always cut around the background shape. I’ve tried png jpg – I would appreciate any help! Thank you so much!
Hey Tricia, send me an email with a few more details of your problem and I’ll get right back to you.
Hi, this way is extremely tedious but sometimes it’s the only option you have but if you are patient you can have just the image you want to cut out without the background clutter. On a computer running Microsoft Windows or OSX (Apple) you would want to use a good photo editor, Adobe has a very nice suite of software that can do this, you can even do vector images with it. Adobe PhotoShop would probably be the best choice but any photo editor that capable of free hand cropping would work. To ensure you get a nice clean line along the edge of the image you want to crop, zoom in as close as you need to and do 1 section at a time. Remember to save as you go. For mobile devices, my favorite app is PicsArt for editing images (it’s the only one I use for all my photo/image editing). If you have a wifi capable printer you can print directly from your tablet/phone when you are done. Adobe has a suite of mobile apps as well but they arent quite as polished as their desktop PC suite of software. Some of the software Adobe offers is pretty expensive for Microsoft/Apple computers but if you work with images a lot, it is well worth every penny. For casual use I believe Adobe Photoshop is free. If not, it doesnt cost a lot and also well worth it. PicsArt is free to use on Android and I know it’s available for Apple but have never used it on an apple device. Anyways, so that’s it… if your image doesnt have layers, your only option is do it yourself using a photo editor. There are some apps out there that can automate this process and a couple actually do a decent job. You select the part of the image you want to keep and the computer tries to remove everything else from the picture. I’ve only had varying degrees of success with these types of tools. As long as the part you wish to keep is very distinguishable from the rest if the image then these sorts of tools work great but I dont have any I can recommend because I just do it myself. Good luck.
Thank you for the thorough answer. This wins the longest comment on the blog prize as well!
Thank. I have had my cricut for 2 years and used it twice. once to make letters for my Parent Board and last Xmas my granddaughter wanted circles to make a snowman. It took me forever. Thanks for answering my questions.
A bit more practice and you’ll get faster. Try and do a project every week and I bet you’ll be a pro in no time!