
How To Use Clipart To Make A T Shirt!
Where can you get the best shirt clipart?
We’ve got one spot in mind… The Hungry Jpeg! Every month, Hungry Jpeg has awesome new clipart bundles for sale, and we’ll show you how you can use them to decorate your blank shirts!
T Shirt Clipart

We used graphics from this clipart bundle to make the shirt transfers and stickers you will see below. While this bundle is no longer available, you can see all the current design bundles on The Hungry Jpeg here!
The Hungry Jpeg’s bundle offers are extremely good value. You can load up on fonts, clipart, and other design files at a fraction of the ordinary price.
The bundle that we used included:
- Thanksgiving clipart
- Christmas clipart
- Food clipart
- Animal clipart
- Plant/tree clipart
- And much more!
Clipart Project Ideas

You can use clipart for almost anything!
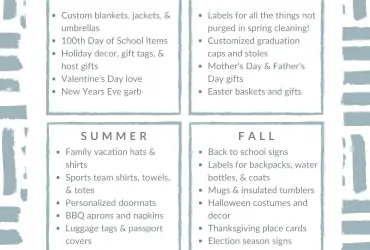
We are using these images to make t-shirts, using printable transfer paper, and DIY stickers, using printable vinyl. Other projects or applications for clipart include:
- printables & wall art
- invitations & announcements
- word documents
- websites
- clothing, bags, phone cases
- kids stickers
But let us show you first how we made a custom shirt with clipart from The Massive Clipart Bundle, then we’ll do the stickers!
T Shirt Clipart Project

We made this Narwhal t-shirt using iron on transfer paper and heat transfer vinyl.
We’re using Cricut Design Space to make this tee, because we’ll cut out the design with a Cricut cutter, but Avery also has free online software. You can upload and customize clipart, then print it using your home inkjet printer.
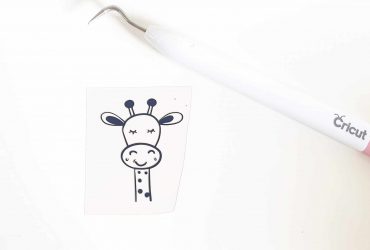
First up, I got the Narwhal PNG from the whales clipart set, downloaded it to the computer, and then uploaded it to Cricut Design Space.
I Saved the PNG as a print then cut, which you can see by the printer symbol in the layers panel. I changed the width of the design to 6.5 inches to suit a kids size t-shirt.

Because I’m using Avery transfer paper for dark fabrics, the image doesn’t need to be reversed. The image will be placed onto the shirt facing upwards and the right way round. I could have used the light fabric transfer paper for this project, but I wanted to be sure the shirt clipart would stand out well on the pink tee!
If you are using the transfer paper for light fabrics, you will need to reverse the image. The transfer paper will be placed onto the garment with the image facing down, and the backing paper on top. The backing paper can be peeled away once the image has transferred.
As you can see in the mat preview below, the image is the largest it can be for Cricut print then cut. The page border is there so that the Cricut Explore Air 2 knows where to cut around the image.

Next I clicked ‘Send To Printer’. I left the bleed option selected, which will allow for a better cut around the image.
We use the Epson WF-2630 inkjet printer to print these images. The transfer sheets are 8 1/2 by 11 inches.

Cutting The Shirt Clipart
After printing the image, I cut out with the Cricut Explore Air 2.
To do this, set the dial on on the machine to ‘Custom’ ,and after clicking ‘Browse All Materials’ in Design Space, search for ‘printable’ and then select ‘Printable Iron On, Dark’.

Next, place the transfer paper onto the standard green cutting mat (picture facing up), and then load the mat into the machine and press go!

The backing on Avery transfer paper has already been cut into three sections, so that it can be removed one section at a time. This makes it very easy to separate the image out from the rest of the paper.

Here’s what the transfer paper looks like when one section is removed – the printed image can easily be taken out.

The image for my t-shirt is all ready to go and now we’re going to cut a word out of heat transfer vinyl to go with it. We’re using this free Karmina font from The Hungry Jpeg to write ‘narrrly’.

Mirror the design so that it will be cut in reverse.

Set the dial on the Cricut machine to ‘Iron On’.

Heat transfer vinyl always goes shiny side down on the mat so that the blade is cutting through the vinyl, and not the carrier sheet. We’re using black Siser EasyWeed HTV.

We weeded the excess HTV away from the cut-out text, and now both parts of my design are ready to go!

Pressing The Transfer
We always use an EasyPress pad when pressing transfers with the Cricut EasyPress. It’s best to press on a hard flat surface (not an ironing board).
Before pressing the transfer, I pre-pressed the shirt for 5 seconds to remove any moisture and wrinkles.

Next, I put the HTV aside so that I could press the Narwhal image first. Avery transfer paper comes with tissue paper that is used between the iron (or heat press) and the transfer.
After a bit of research on how to press Avery Transfer Paper with the EasyPress, I decided to modify the iron-on instructions and press the image at 340°F for 50 seconds. This worked great and there were no problems. Check out this video for the iron on instructions.

I left the tissue paper on and allowed the transfer to cool for a couple minutes. Then I slowly peeled back the tissue paper starting from the top corner to the bottom corner.
If any part of your image lifts, you’ll need to replace the tissue paper and press it again in that area.

Siser recommends to press EasyWeed at 335°F for 10-15 seconds with the Cricut EasyPress. I lowered the temperature from 340 to 335, replaced the tissue paper over my Narwhal image to protect it, and pressed the EasyWeed for 15 seconds.
Next, I positioned the EasyPress so that it didn’t touch the Narwhal image at all while pressing the EasyWeed. I didn’t want to over-press my Narwhal image! And lastly, I peeled the carrier sheet hot.
And there you have it – a custom t-shirt with a super cute Narwhal graphic! A cute new addition to our daughter’s wardrobe! (She’s getting quite the collection of personalized tees now! :D)
There are so many awesome graphics to choose from over at The Hungry Jpeg, so have a browse, find one you love, and make your own cool t-shirt!

Easy Stickers With Clipart
These macaron cliparts were too cute to pass by – I just had to make some stickers with them!
I used Cricut Printable Vinyl for this project.

Of course, the macaroon graphics came from the clipart bundle.
Many of the clipart bundles at The Hungry Jpeg are only available for a limited time, so if you see one you like, grab it quickly!
*This is a sponsored post on behalf of The Hungry Jpeg – though that does not lessen the amazingness of this bundle. We say what we mean and we mean what we say!
(Please note: This post contains affiliate links. Read our full disclosure policy here.)
Hi! When using the EasyPress it is it still recommended to move it around as if using a traditional iron as per the directions? Or do I just press and hold like when doing HTV? Thank you!
Hi Lisa, no it’s best to keep it in the one position and press down.