
Split Letter Monogram Tutorial Using Cricut Design Space
How do you make a Split Letter Monogram in Cricut?
To get started, just find a font you love in Design Space, or download one from a font website. If you don’t know how to install system fonts into Design Space, see our article on how to do it here.
We’re going to use the weld and slice tools for this project, which may seem a little daunting to any beginners out there, but I’ll go through the whole process step-by-step. Trust me, it’s very simple!
Split Monogram Tutorial
Split letter monograms make great designs for tote bags, mugs, pillow covers, tumblers, clothing, shoes, and just about anything really!
Split letter monograms are also just one type of monogram you can create, there are so many other different ways to create a monogram (just have a look on Pinterest).
We have also created a video tutorial of the method below if you prefer to watch how things are done!
1. Create Your Letter
Open Design Space and start by selecting the text tool and typing in your letter (or letters).
Next, change from the default font to your desired font. For my monogram, I’ve chosen the font ‘Classic Roman Std Regular’ in Cricut Design Space.
After that, select what size you would like your letter to be. I changed my letter to 5 inches wide by typing 5 in the width box. It needs to be the right size for what you are putting it onto, whether that be a t-shirt, a mug, or a bag.

2. Create First (Fatter) Rectangle
Use the shape tool (found on the left hand menu) to make a square.
Change the square to a rectangle by clicking the lock symbol in the bottom left corner of the square and unlocking it. Then using the green arrows in the bottom right corner you can make it whatever size you need.
Make the rectangle as long as you like, depending on how you would like your design to look, and your particular letter of the alphabet.
Next, select the rectangle, hold down ‘ctrl’, and select the letter (or just click select all). Click the ‘align’ tab at the top of the canvas, and then choose ‘center horizontally’, and ‘center vertically’.

3. Create Second (Thinner) Rectangle
Duplicate the first rectangle so that you have two. You do this by selecting the first rectangle and then clicking duplicate, which is found underneath the ‘Make It’ button on the right of the canvas.
Make this second rectangle slightly longer on each end than the first (so that you will be able to easily differentiate the two). Make this second rectangle also skinnier than the first one, so that a strip of the first rectangle shows up above and below the second. You might have to unlock the triangle again in order to re-size it.
After this, select all again and re-align the new rectangle both horizontally and vertically, as we did above.

4. Weld The Letter & Fatter Rectangle Together
Select the first (fatter and shorter) rectangle, hold down ‘ctrl’, select your letter, and click ‘weld’ (found down the bottom right of the Canvas).
The letter and the larger rectangle are now welded together into one image, and should look like the screenshot below.

5. Select All & Slice
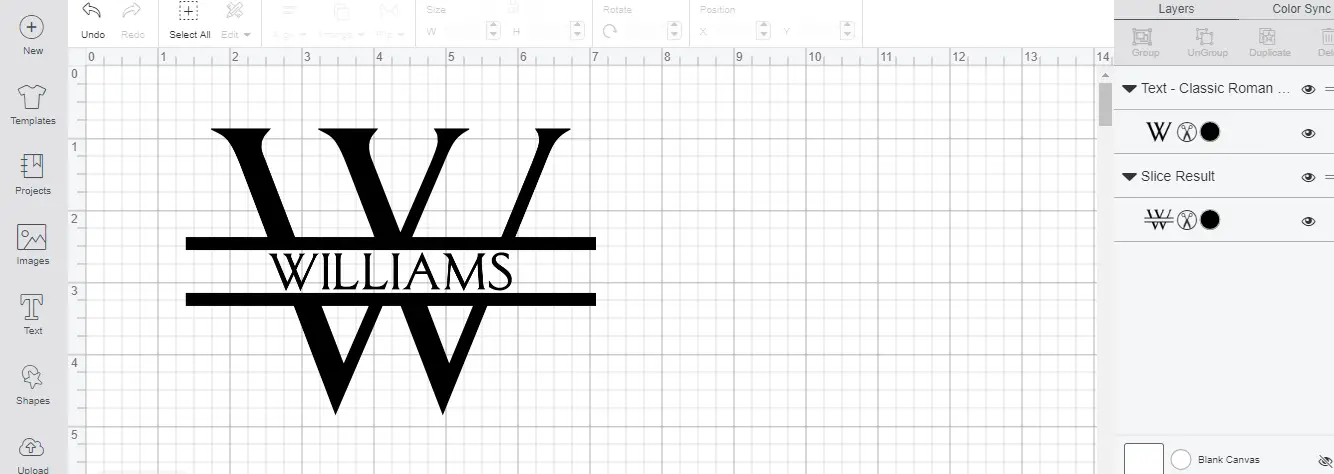
Without moving anything, click ‘select all’, and then click ‘slice’ – also found down the bottom right of the Canvas. The middle of the fatter rectangle will then be sliced away.
Move all the excess pieces away from the middle of the letter. It should look something like this:

Now just delete the excess components.
6. Write The Name For The Center
Make a new text box and write the name you would like to appear in your design.
Change the font (and color) if you would like, or keep it the same as the letter, like I have.
Then, as we have done before, select everything and click ‘align’ and click ‘center horizontally’ and then ‘center vertically’. It should be perfectly positioned like this:
7. Weld (Or Attach) Everything Together
Lastly, select everything and either click ‘weld’ or ‘attach’ (found down the bottom right), so that your design will be cut exactly as shown on the canvas. Change the color of your design if you would like to see exactly what it will look like in the color of vinyl you’re using. Click ‘make it’ and you’re ready to cut!
Leave mirror off if you’re using adhesive vinyl, or put mirror on if you are using heat transfer vinyl.

So there you have it – easy as anything!
What are you making a split letter monogram for? Let us know in the comments below.
Resources
Here are some more related articles you may find helpful:
(Please note: This post contains affiliate links. Read our full disclosure policy here.)


I’m trying to understand why the smaller, thinner rectangle is inserted? What is that for? Thank you very much for your help!
Hi Erin – the small thin rectangle is there to create the split in the split letter monogram. That way you can insert a word for example the full name behind the monogram. For example, mine might be LMP with my full name “Lauren” written in the ‘split’ area. Hope that helps!
Thank you for the details video on this. I can’t wait to try it. Whoo Hoo
I don’t have an align button now what
Should be there – it may be you haven’t selected the two components correctly. It will only show up as an option when you have selected both.