
How To Make & Apply Cricut Vinyl Labels – Kitchen Storage Ideas
Want to know how to cut vinyl on Cricut? Or just after a Cricut vinyl project idea?
Either way, you’re in the right place!
When I came across these cheap storage canisters, I knew I had to customize them with vinyl… Best thing about Cricut? You can customize almost anything!
Keep reading for a step-by-step tutorial on how to make labels with Cricut, and how to apply them.
Custom Cricut Vinyl Labels

My husband only drinks Earl Grey, and I only drink English Breakfast, so I thought it would be cool to have dedicated custom storage canisters for our tea.
And, of course, we can’t forget coffee!
Permanent Adhesive Vinyl
To decorate my canisters I’m using EZ Craft USA permanent adhesive vinyl. This pack comes with 40 12″x 12″ vinyl sheets, and it’s very cheap!
I’m using one of the gold sheets to decorate my canisters.
Oracal 651 is definitely a better permanent adhesive vinyl (it’s easier & nicer to work with), but when the price is right, the price is right!
This adhesive vinyl can be hand washed, and would survive plenty of washes in the dishwasher. It’s hardy, and you shouldn’t expect it to crack, fade, or peel.

Here are the canisters I’ll be decorating, along with the gold permanent adhesive vinyl.
To prepare the containers for applying vinyl, I wiped down them down with rubbing alcohol. This removes any dirt, dust, or grime, and will allow the vinyl to adhere better.
Make sure your substrate is completely dry before you transfer your vinyl.

Vinyl Designs
Here are the designs I’ve made in Cricut Design Space.
I chose a font called ‘The Only Exception‘, and downloaded it onto my computer for use in Design Space.
Once in Design Space I took the following steps to create my design:
- opened a text box
- typed out my text
- welded the letters in each word together
You can find SVG images of tea cups and tea bags here on Creative Fabrica.
Next I just decided how big I wanted my designs to be on my canisters. DON’T mirror your mats when using vinyl (only HTV).

How To Cut Vinyl On Cricut
To cut vinyl with your Cricut machine, place it color side up and backing paper side down onto the cutting mat.
Select ‘vinyl’ in your material settings if you’re using a Maker, or set your dial to ‘vinyl’ if using the Explore Air 2.
Depending on the type of vinyl you’re using (glitter, holographic, etc.) you may want to do a test cut and then alter the default cut settings.

Now the design is cut. It’s time to separate the designs and weed away the excess vinyl.

This vinyl was actually quite hard to weed. I normally stick to well known brands of vinyl (e.g. Cricut, Oracal 651, etc.) and so did not expect to have this difficulty!
When I lifted away the vinyl the whole design wanted to lift up with it, and there was barely any stickyness to keep it down onto the backing paper. I had to weed it extremely slowly and carefully, holding the parts of my design down, while removing away the excess.
I’ve never had this much trouble with weeding before! However, this vinyl was pretty cheap! Apart from the weeding process, I had no more problems with it.
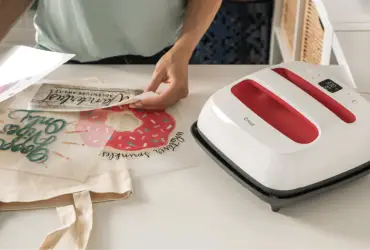
Apply Transfer Tape To Vinyl
Once the design is cut and weeded, you need to apply transfer tape. This lifts the vinyl decal off the backing paper, and allows you to then apply the whole thing in one go in the right place.
Despite my problems weeding the vinyl, it adhered fine to the Cricut transfer tape, and then to the canisters. And I do love the gold color! If you want to try this brand, you’ve just got to weed it really slowly!

I placed Cricut standard grip transfer tape over top of my design, making sure there were no air bubbles. I used a squeegee to burnish it and make sure the vinyl had adhered to the transfer tape.

Next, I cut as close as possible around the edge of my design. The smaller the amount of tape you work with, the easier it is to position your design and make sure it goes on straight. Then, I removed the backing paper.

How To Apply Cricut Vinyl
To apply the vinyl onto the canister, I first positioned it over top and made sure it was straight and centered vertically.
Then I pressed down the middle of my design. From the center I slowly pressed out towards one side, and then starting from the center again repeated the process with the other remaining side.
I burnished my design again with my squeegee (comes with the Cricut tool set) to make sure it was stuck down.

To remove the transfer tape, I started with one corner and rolled it back onto itself so that the tape being peeled away remained flat against the canister. If you try and lift the tape straight up, this will more likely make your vinyl lift back up with it.
Do this part very slowly, in case some of the vinyl has not adhered well and needs more burnishing.

Love how these turned out – these will definitely be a joy to use in the kitchen. It’s always so much better to have things like this around the house that you’ve made or customized yourself – much more satisfying than just buying it with a label already on it (in my opinion)!

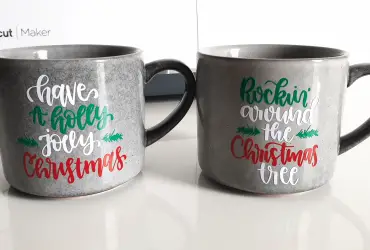
This vinyl actually reflects colors… How pretty!
If you are transferring vinyl onto mugs, it’s best to let the vinyl cure for a day or two before you start using your mug. It’s also best to hand wash these sorts of items to make them last longer!
Cricut Labels
So that’s how to make vinyl labels with Cricut.
It’s very straightforward, and once you’ve done it a couple of times it will be a breeze.
Let us know what you think in the comments below… And if you were wanting some advice on what to put in empty tea & coffee canisters, visit our friends over at The Coffee Folk!
Pin this post!
(Please note: This post may contain affiliate links. Read our full disclosure policy here.)
No Comment