Cricut Mini Press Project – A Super Quick & Cute Custom Tee!
This Cricut EasyPress Mini Project was so quick and easy!
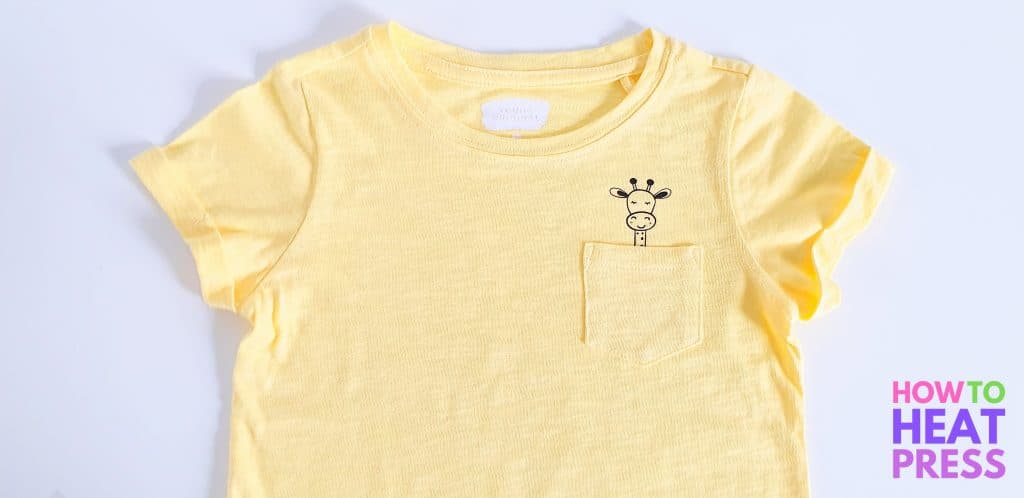
In this project, we’re adding a small HTV heat transfer to a kids shirt…
This is how to use the Cricut mini press, and how to edit SVGs in Cricut Design Space.
Cricut Mini Press Shirt Project
We’re using the Cricut Maker to cut the design for this project, but any vinyl cutting machine is perfectly suitable.
We’re also obviously focusing on using the Cricut EasyPress Mini, but any of the other EasyPress machines would also be totally fine!
The mini press does have a bit of an advantage for this specific project, however, because it’s best for getting into small places. We’re pressing this heat transfer around a pocket, so the Cricut mini can get right in there!
Edit SVG In Design Space

For this project we’re using this cute Giraffe SVG!
We only want the head of one giraffe to be poking out of the shirt pocket, so I need to edit the SVG in Design Space first.
How I edited this SVG:
- Deleted the giraffe on the left
- Removed the white layer so that there was only a black layer left in the design
- Welded the black layer together
- Created a square with the shape tool
- Positioned the square over the body of the giraffe
- Selected the square and the giraffe and sliced them together
- Deleted all the sliced elements; the body of the giraffe, and the square
- Decided what size I wanted the giraffe head to be
- Clicked Make It
- Selected to mirror my mat (for HTV), and clicked continue
- Selected Iron On as my material type
Here’s a look at how I sliced the body away from the giraffe using the shape tool.

After slicing I deleted everything else so that only the head remained. I sized it for my t-shirt and clicked ‘Make It’.

I mirrored the mat, since I’m using heat transfer vinyl.
However, if you have a symmetrical design, and you don’t have any text, you don’t really need to mirror HTV! I always do though, just to keep up the good habit!
Iron On For Mini Press
I set the material in Design Space to Iron On, loaded the cutting mat into the Maker, and clicked go.
Today I’m using ImPRESSED vinyl HTV.
This is a quality iron-on vinyl that we’ve never had any problems with – it’s easy to cut and apply, and the results are great!

After the giraffe head was cut out, I weeded away the excess iron on so that only the design remained on the carrier sheet.

How To Use The Cricut EasyPress Mini
Now it’s time to press the design using the Easy Press mini.
Referring to the Cricut heat guide, here’s how to heat press the design:
- Turn EasyPress Mini on, set to medium temperature and allow to heat up
- Pre-press garment for 5 seconds
- Press design for 25 seconds using light pressure, while constantly moving the EasyPress
- Press the back of the garment for 15 seconds
- Peel carrier sheet warm
I’m using a silicon pad to press on, but you can also use an EasyPress mat if you have one!

I turned on my EasyPress Mini, set it to medium temperature, and waited for it to heat up. It didn’t take long to heat up!

I pre-pressed the garment for 5 seconds.

I positioned the design onto the shirt. If you like, you can use heat resistant tape to tape your design down. This is because you will constantly need to move the EasyPress Mini as you press your design.

I placed a Teflon sheet over the design and pressed it for 25 seconds, constantly moving the EasyPress Mini, as Cricut recommends in their heat guide.

Then I turned the t-shirt over and pressed the design from the back for 15 seconds.

I let the design cool down for a little bit, and then removed the carrier sheet.
Just like that, it’s all done! It looks like the giraffe is just having a little nap in the pocket! So cute.

A perfect EasyPress Mini project!

Mini Press Project Ideas
So that’s one idea if you wanted to know what to use the Cricut mini press for!
Other fun ideas include putting HTV on shoes, caps, and pencil cases, or using it as a logo or brand press. Make sure you check out our Cricut EasyPress Mini review for more information, and leave us any questions down below!
Pin this post! 🙂
(Please note: This post contains affiliate links. Read our full disclosure policy here.)