Make Custom Active Wear With Cricut SportFlex Iron-On
Today we’re trying out Cricut SportFlex Iron On!
Cricut SportFlex Iron-On is an HTV for garments containing polyester and nylon. Most commonly this includes active wear and other sports and workout clothing.
In this post we’ll tell you everything you need to know about SportFlex Iron On, and show you how to make your very own custom workout gear!
Cricut SportFlex Iron On

Cricut Sportflex is just like any other Cricut Iron On in that it can be cut using any of the Maker or Explore cutting machines. And, of course, any vinyl cutting machine will be suitable for cutting SportFlex.

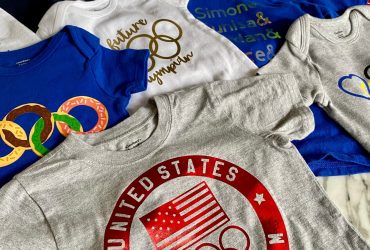
Today I’m making these co-ordinating workout tops.
Here’s what I used to complete this project:
- Cricut Maker
- Cricut EasyPress
- SportFlex Iron On Spa Day Sampler (on Amazon or on Cricut)
- 2 Plain Activewear shirts
As well as other standard Cricut Accessories such as the weeding tools, cutting mat, and pressing mat.
SportFlex Design
Here is the design I’ve made in Cricut Design Space.
I’m using the free fonts Ciscopic for the adult shirt and DK Lemon Yellow Sun for the kids shirt (how to upload fonts to Design Space).
I decided to make ‘GETTING FIT’ 8 inches wide for the adult tee, and ‘THROWING FIT’ 7 inches wide for the kid’s tee. When I had my design perfect, I clicked ‘Make It’.

How To Cut SportFlex
Next, I mirrored my design because I’m using Iron-On. My Cricut Maker will cut it out in reverse, but it will transfer onto the shirt the right way around!
If you have multiple mats, make sure you select the mirror option for EACH mat.

I’m cutting my design out of SportFlex Iron On. To get the right cut settings I first clicked ‘browse all materials’.

Next I just searched for ‘sportflex’ and selected SportFlex Iron On.

I bought the SportFlex Spa Day sampler which includes the colors Blue Sky, Gray and Sea Foam. This Iron-On is perfect for polyester and nylon fabrics (or poly/nylon blends).
I’m using the color Sea Foam for this project. Such nice colors!

Here’s the Cricut Maker cutting out the Iron-On.
I’m using the StandardGrip cutting mat and I’ve placed the vinyl shiny (colored) side down. If you are using a Maker, remember to always leave plenty of room behind the machine as it scans the entire mat before cutting.

How To Weed SportFlex Vinyl
I removed the Iron-On from my mat, separated the designs and then weeded them.
I weeded the inside of the letters out first, and then pulling from left to right I removed the rest of the vinyl from the outside. This way you are pulling the vinyl into the cavities of the letters – a more effective and quicker way to weed!

How To Heat Press Cricut SportFlex
Today I’ve decided to use the Cricut EasyPress for this transfer. I always use a silicon pad underneath the garment which provides a firm surface to do the transfer on.

On Cricut’s website they have an Interactive Quick Reference Guide for using the EasyPress.
First, you select the type of Iron-On + your base material. Then you select whether you are using a towel or the EasyPress mat. The Quick Reference Guide then tells you how to apply the Iron-On.

I turned on the EasyPress, set the temperature to 305°F and set the timer for 30 seconds. I let it heat up for a couple minutes. When the EasyPress has fully reached temperature, the go button will turn from orange to green.
Next, I pre-pressed my garment for 5 seconds to remove any moisture or wrinkles. Cricut always recommends pre-washing any clothing before doing heat transfers. This is because any manufacturing chemicals in the clothing can stop the Iron-On from adhering properly.

I like to position the design about a 3 fingers width down from the bottom of the collar.
I placed the design onto the shirt, covered it with a Teflon sheet and pressed start. When you press the start button, the timer will start counting down. I pressed the design for 30 seconds with gentle pressure.

Next, without peeling away the carrier sheet, I turned the shirt over and pressed the back for 15 seconds.

Always check the instructions for your type of Iron-On as to whether the carrier sheet is a hot, warm, or cold peel. Cricut SportFlex is a warm peel.

Looks perfect!

First top all done, then I just repeated the process with the remaining t-shirt!
Completed Iron On Project

This was a really simple design, but it sure beats plain t-shirts!
SportFlex Iron On Instructions
How To Cut SportFlex:
- Mirror your design in Cricut Design Space
- If using the Explore Air 2 set your dial to ‘custom’, select ‘browse all materials’ and then search for and select ‘SportFlex Iron On’. If using the Cricut Maker, the custom options will appear by default. Click ‘browse all materials’, search for and select ‘SportFlex Iron On’
- SportFlex Iron On is placed shiny/colored-side down on the cutting mat
- Load the mat into the machine and press go
- Once the design is cut out, unload the cutting mat
- Weed away excess vinyl from your design so that it is ready to transfer
How To Heat Press SportFlex:
Instructions for using the Cricut EasyPress on Polyester and Nylon fabrics, using an EasyPress mat or equivalent.
- Pre-wash clothing to remove manufacturing chemicals
- Turn on EasyPress, set temperature and allow to heat up
- Pre-press garment for 5 seconds to remove moisture and wrinkles
- Press design with gentle pressure for 30 seconds (use a protective sheet between the EasyPress and your design with Polyester fabrics)
- Turn garment over and press the back for 15 seconds
- Peel carrier sheet warm
Cricut SportFlex Review
We really enjoyed working with this product. It was easy to cut, weed, and apply. So far it’s wearing well, and we look forward to further Cricut SportFlex Projects.
Is it the best HTV for sportswear? Maybe! Haha – we haven’t tried them all out yet. Another alternative is Siser EasyWeed Stretch. But we can whole-heartedly recommend Cricut SportFlex!
Pin this post!
(Please note: This post contains affiliate links. Read our full disclosure policy here.)