
Cricut Iron On Lite Project – DIY Peter Rabbit Throw Pillow
How to make a custom throw pillow with Cricut Iron On Lite!
I wanted to make something really cute and personal for my daughter this week. She’s coming up 3, will soon learn to read, and has always loved Peter rabbit. What could be better than a custom Peter Rabbit throw pillow?
A great typewriter font that I found on FontBundles.net (sponsors of this post) will be perfect for the project!
Cricut Iron On Lite

I’ll also be testing out Cricut Iron On Lite for this project.
Iron On Lite is very similar to Cricut Everyday Iron On, but it has a matte finish rather than semi gloss. The Lite is also said to be better for garments.
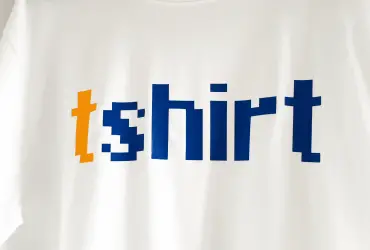
Because I want to do a text design to show off the font, I’m pressing the first sentence of ‘The Tale Of Peter Rabbit’ onto a throw pillow.
Here are a few more custom pillow cover ideas. Even use a free font from FontBundles!
- An inspirational quote – ‘If you try to fail, and succeed, which have you done?’
- The name of the giftee – ‘My Beloved Myrtle’
- A Bible verse – ‘The Lord your God is with you wherever you go’
Travelling Typewriter Font Alternative
Peter Rabbit is a classic story, and the original book is written in a typewriter font. When I saw the font ‘Intellecta Typewriter‘ from Font Bundles, I knew it would be perfect for this project.
It’s similar to the popular ‘Travelling Typewriter Font’, and is a good alternative if you need it for commercial use.
When purchased through Fontbundles, your fonts, clipart, or other design files include a commercial use license. The free Travelling Typewriter font does not!

I ordered and downloaded the font, and then installed it onto my computer.
This is done by locating the downloaded file on the computer, opening it, and clicking ‘install’. You can read more about how to install fonts in Design Space if you need to!

Text Design In Cricut Design Space
I copied my quote, selected the text option, and pasted it onto the canvas in Design Space. Then I selected to change the font, started typing the name of my new font, and it appeared below the search bar.

Voila! My brand new font.
I love old fashioned book fonts and typewriter fonts – they look great. Now it’s time to play around with my text and arrange it how I would like it to appear on the pillow cover.

It was really hard to decide… left alignment or center alignment?

I decided left alignment was better as it’s more “book-like”. Next decision… should ‘ONCE’ be in all caps, or not?
Upper case ‘ONCE’ is a little more interesting!

Next I worked out what size I wanted my design to be. My throw pillow cover is just under 16 x 16 inches so I decided I wanted my design to be 11 x 11 inches (as Cricut Iron On is only 12 inches wide anyway).
I changed the width of my project to 11 inches wide, and then simply increased the line spacing until the height was about 11 inches too. This made my project as square as possible.
Here’s a view of my mat. The mirror option is selected for heat transfer vinyl.

How To Cut Cricut Iron On Lite
Here’s a look at the blank pillow cover, and we’re using using black Cricut Iron-On Lite.

Here’s the Cricut Explore Air 2 all set and ready to cut out my design.
The Cricut HTV is placed shiny side down on the mat, and the Air 2 dial is set to ‘Iron-On’. If using the Maker you can select Iron On Lite on the computer before cutting.

Once cut, it’s time to weed out the excess vinyl.
We have a post with vinyl weeding tips, but you can see that I forgot to take my own advice – it’s much easier to weed the inside cavities of the letters first before pulling away all of the excess vinyl. That’s because the carrier sheet is so sticky!

How To Press Cricut Iron On Lite
Always make sure you pre-press your fabric to remove any wrinkles and moisture.
Do this for 10-15 seconds with a household iron, or 2-3 seconds with a heat press. This will help the heat transfer vinyl adhere better to the fabric.

And here’s the finished product. I think it was the perfect font for this project, and I’m really happy with how it turned out.
Pick up some Cricut Iron On Lite, choose a font from Fontbundles, and make something yourself today!

I love HTV projects! Great idea you had! Would look really cute in a vintage child’s bedroom/playroom!
Yes I love doing projects like this – always looking for a new HTV project to try out 🙂 Thanks for the comment.
I would like Monogramania 2 font.
Thanks Sanam. That does look like a great font – I see you’re in the draw, all the best!
What do you think of Cricut iron on? Is it easy to work with?
I think Cricut Iron-On is pretty good, but I prefer Siser Easyweed and think that it’s better. Weeding Siser is a quite a bit easier – the Cricut vinyl tends to be harder to lift off and breaks quite a bit. I also think Siser vinyl adheres better. Cricut vinyl seems to sit on top to a greater extent.
Pillow looks great ? my kids love Peter Rabbit as well and this has given me plenty of Peter Rabbit project ideas. I’ve entered the competition and hope to win the free font!
Hey Briony, yes while I was doing this project I also had a whole lot of other Beatrix Potter project ideas – all the characters are memorable and fun to make projects with using fonts and SVGs. All the best for the competition.