Cricut Flatten Guide: What Does Flatten Do In Cricut Design Space?
What does flatten do in Cricut Design Space?
Flatten is a tool that turns multi-layered images into a single-layered image.
SVG cut files with multiple layers can be flattened down into single-layered images, printed out with your printer, and cut out with your Cricut machine, using print-and-cut.
The flatten tool is instrumental in making stickers, labels, decals, and much more.
What Does Flatten Mean On Cricut?
The Flatten Tool:
- Changes multi-layered images into a single-layered image
- Is used to make any image a printable image for print-and-cut
- Removes all the cut lines from an image
- Retains all of the colors of the multi-layered image
How To Use The Flatten Tool:
- Select the layers you would like to flatten together by clicking ‘select all’ or by holding down ‘ctrl’ while clicking the layers
- When the layers are all selected, click flatten in the bottom right corner
- The image is now flattened – in the layers panel you’ll only see one layer and it will say ‘flatten’
Here are three examples of when and how to use flatten in Cricut Design Space.
1. Cricut Print & Cut Stickers
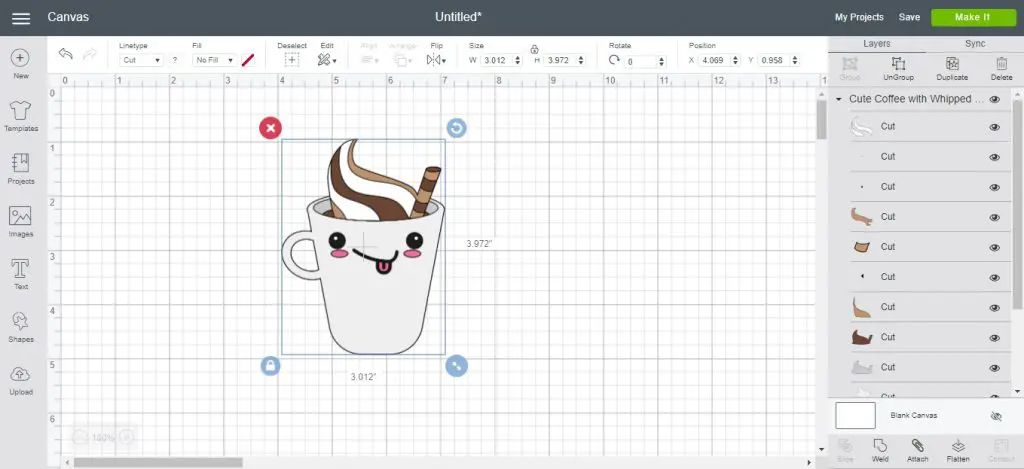
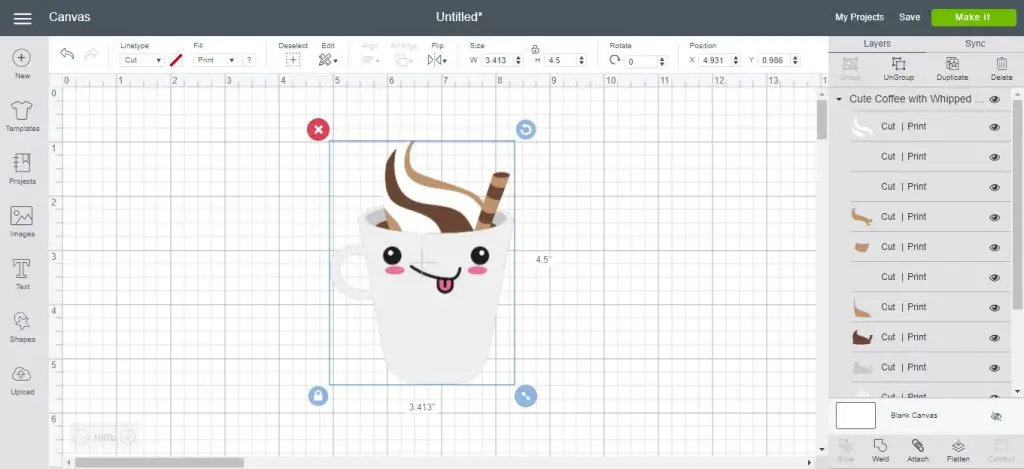
Here is a multi-layered SVG cut file I found in Cricut Design Space.
In the layers panel on the right you can see all the layers in this design. To use this SVG as a print-then-cut image I can only have one layer. So I must use the flatten tool to flatten all the layers down, so that I have a single-layered image.
To flatten an image like this, simply select all the layers in your image, and then click ‘flatten’ in the bottom right corner.
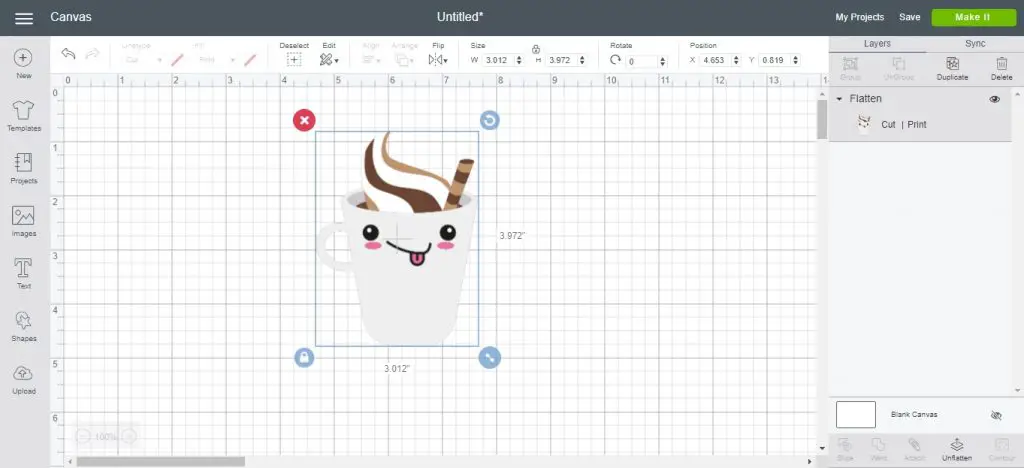
Clicking ‘flatten’ removes all the cut lines from the image. It is now a single-layer image which I can use for print-and-cut. In the layers panel on the right it only shows one layer now, and it says ‘flatten’.
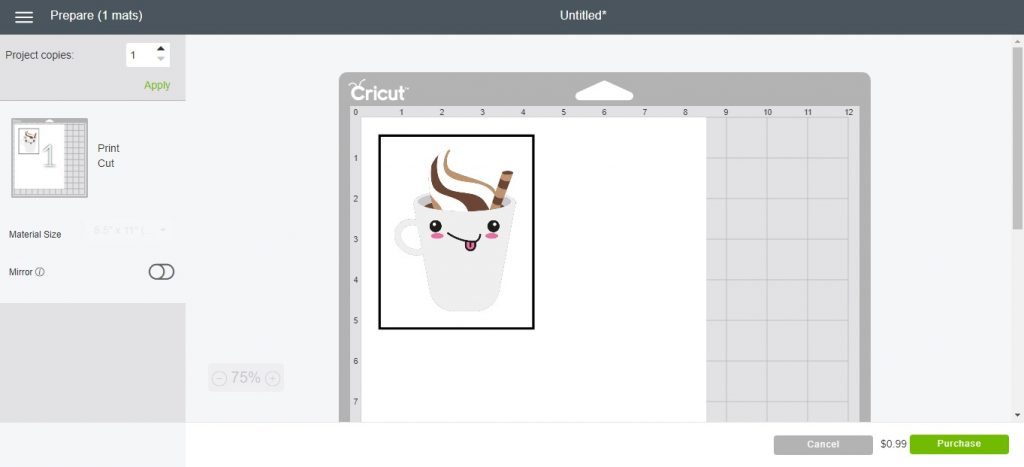
Click ‘Make It’ and you’ll be able to view your mat preview. This shows how your image will print out onto your page. Everything looks good here! I can print this image out with my printer, and then load that printed image into my Cricut and it will cut around the outside edge of the image.
Check out our full Cricut print and cut tutorial for more info.
There is another way to change something to ‘print’, and I want to make it clear that this option does not make your SVG a printable image!
Changing the fill to print (next to linetype up the top), does NOT make this SVG into a printable image! It changes the layers to print-and-cut, but the layers are still there! For print-and-cut you must only have ONE layer, and you will need to use the flatten tool for this.
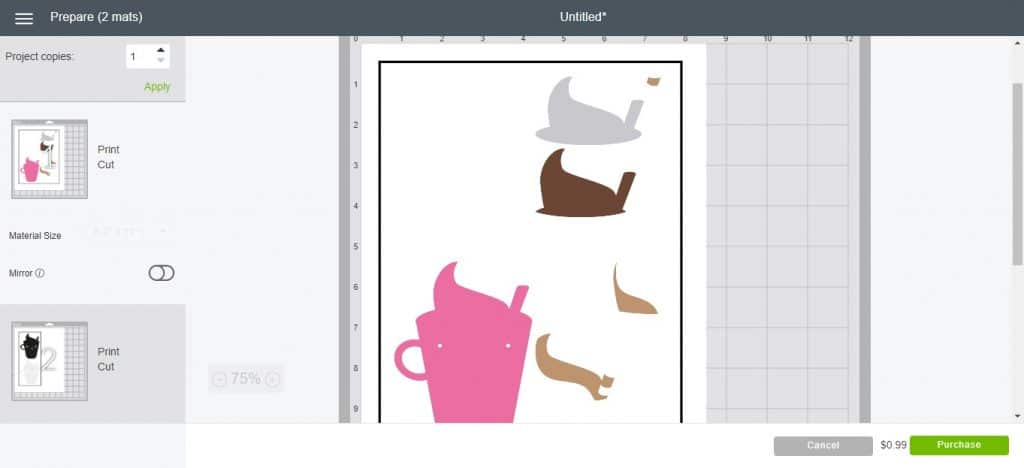
See the screenshot below for the results of this method!
The mat preview shows that although the layers are printable, they are still separate layers. They must be flattened down into ONE image with the flatten tool.
2. Kitchen Labels With Cricut Flatten
Here’s another example, this time showing how to use flatten with text.
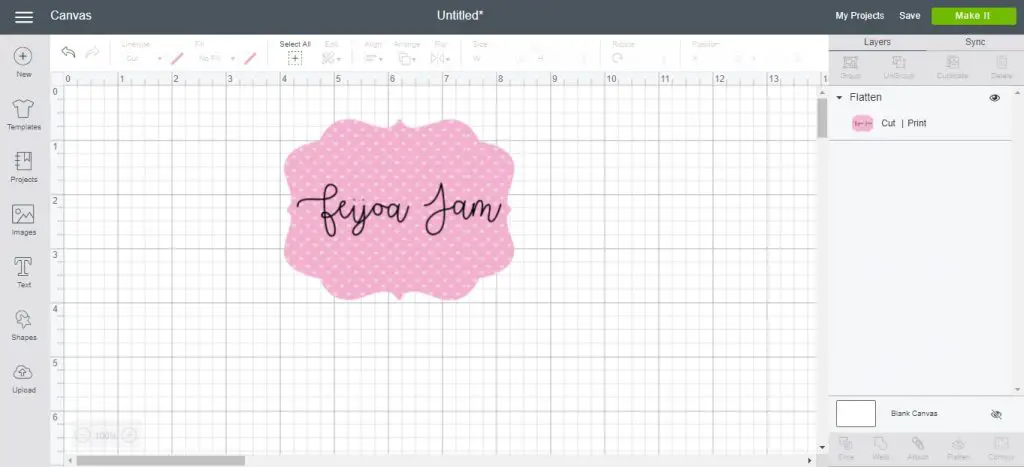
I’ve got a label filled with a pattern that I have previously uploaded to Cricut Design Space (see how to use patterns with Cricut). And, I have the text ‘feijoa jam’ which I have positioned on top of the label.
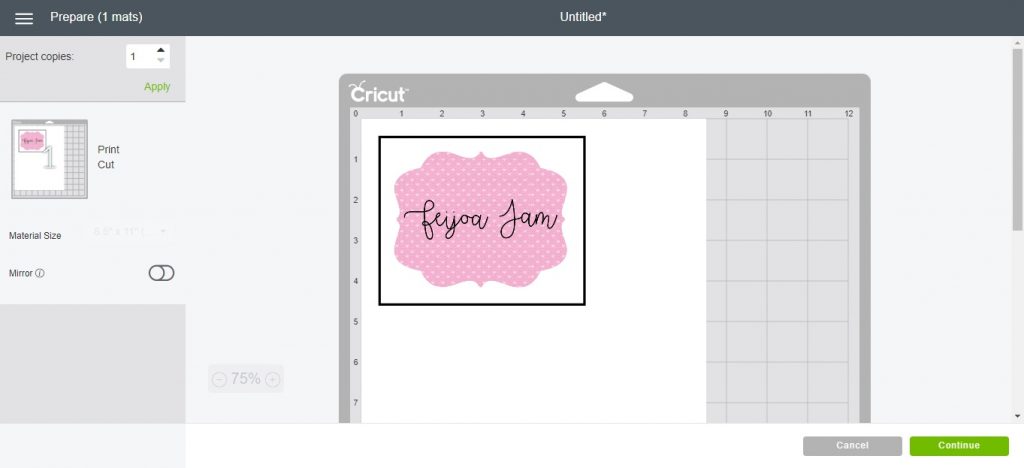
There are multiple layers which I will need to flatten to make this a printable image. Then I will be able to print this image out onto printable vinyl or printable sticker paper, and cut out around the image with my Cricut.
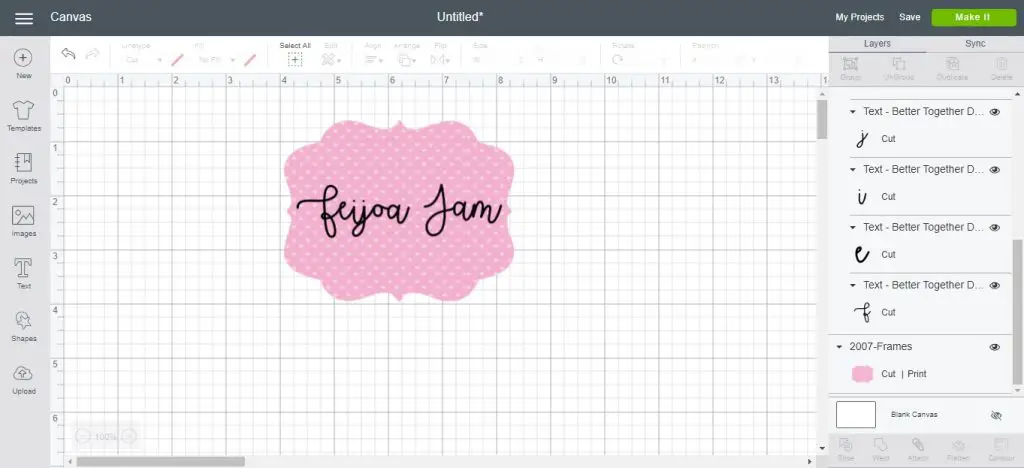
If you have text as a layer, the method is still the same. Select everything, and click flatten. The image will now be a single-layered printable image ready for print-and-cut.

Once again, I can print this out with my home printer, place the printed page onto my cutting mat, load it in my Cricut machine, and my Cricut will cut it out.
See our full tutorial on how to use print and cut in Design Space.
3. Use Flatten In Mock Up Designs
My last example for using the flatten tool is for making mock up designs in Design Space!
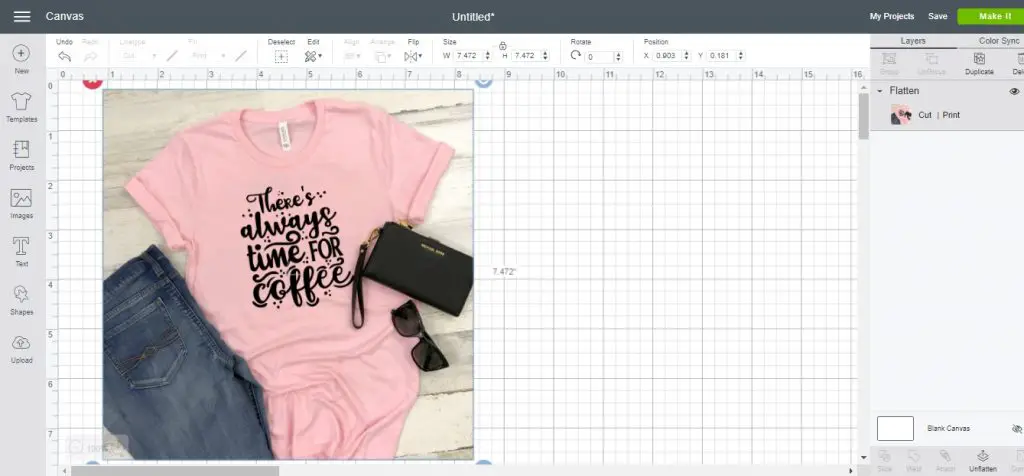
Simply placing a SVG on top of a mock up background is not enough! The SVG has multiple layers and therefore has cut lines. So flattening the layers together will remove the cut lines and make your mock up look A LOT better!
Position your SVG on top of the mock up background, select everything and click ‘flatten’.
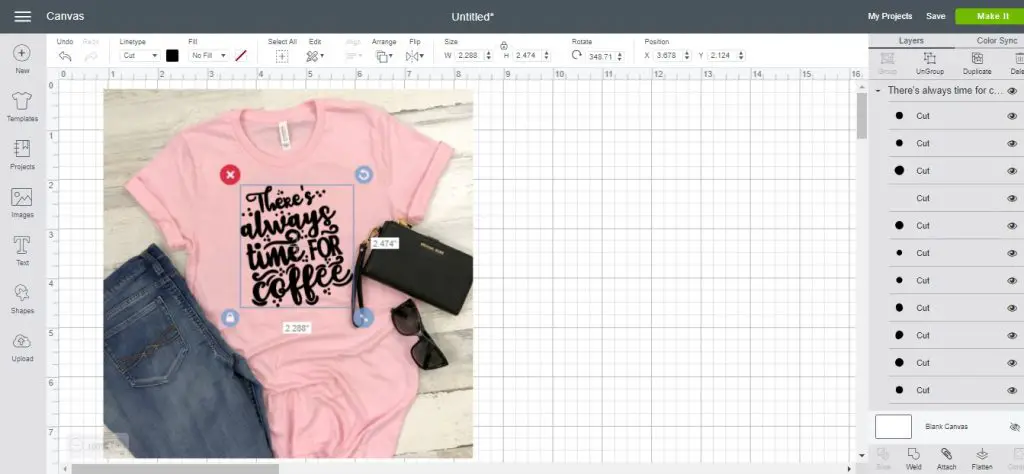
Ta da!
The cut lines are gone, and now it looks like the design is actually ON the shirt! Amazing!
See our full tutorial on making mock ups in Design Space for more info.
What Does Flatten Do In Cricut Design Space
I hope that explains what the flatten tool is used for in Design Space. As you can see, using the flatten tool is very very simple!
Check out some of our other Design Space tutorials:
- How to use weld in Cricut Design Space
- How to use slice in Cricut Design Space
- How to upload and convert JPG and PNG images into SVG cut files in Design Space
Let me know if you have any questions or comments down below. Thanks!
(Please note: This post contains affiliate links. Read our full disclosure policy here.)


Very good explanation. I can see where I’ve made so many mistakes 🤦♀️🤦♀️
While mistakes are frustrating it’s always so nice to learn and move past them! So glad it was helpful, Lauren!
extremely helpful info – thank you!
Thanks, Kathy! I’m so glad it was helpful to you. Happy crafting!
Thank you so very much for this tutorial. I had NO idea what the heck flatten did. I just did my first print then cut last night for a onesie that I made for my sister in law’s baby shower. Previously I had avoided print then cut bc for some odd reason I was intimidated by it! I don’t know what the heck was wrong with me, but even after purchasing 2 different kinds of print then cut vinyl I still didn’t try it bc of all of the horror stories I had heard about it, I.e. how it wouldn’t press right and how they messed it up by printing it on the wrong side. Even how it only lasted for one wash. Well, I finally tried it and it was much easier than I thought. Even though I did print it on the wrong side the very first time, but you learn as you go. I am glad I learned what the flatten tool is now so that I can go back and make some of the images that wouldn’t cut when I tried it the first rime. Specially baby Minnie Mouse. LOL! Thank you again and keep up the great work! God bless you and stay safe! 💜
Hey Nekia – I love hearing that you gave it a shot and you’re excited with how it turned out. Trying new things can seem costly and intimidating so I don’t blame you at all for feeling that way! Keep trying and enjoying the process. Be well : )