
How Do I Calibrate My Cricut Maker Or Explore Air 2?
Are you having problems with your Cricut machine cutting?
I had this problem recently, because I think I bumped my machine, and the cutting accuracy went way off!
Well, there’s actually an easy fix to this problem that doesn’t involve a new blade – you just need to calibrate your blade! Calibration is a simple and straightforward process that adjusts and gauges the accuracy of your blade, giving you more precise cut lines, better crafting results, and way less frustration!
How To Calibrate Your Cricut Machine

What Is Cricut Calibration?
Calibration helps your Cricut cutting machine to recognize the blade housing, giving you the most accurate and precise cuts possible for your projects. Calibration gauges, measures, and adjusts the alignment, sizing, and cut accuracy of your blade.
The process of calibrating your machine involves your Cricut making a series of calibration cuts, whereby you are asked to respond to prompts questioning the accuracy or alignment of those cuts.
You provide feedback of whether you are satisfied with the cuts or not, and your machine continues to adjust and measure the accuracy of those cut lines.
You can calibrate your Cricut Maker machine using the rotary blade, the knife blade, or the Print and Cut feature in Design Space. For the Cricut Explore Air 2 you can only calibrate using Print Then Cut.

Calibration For Print Then Cut
Print Then Cut is likely the most common reason for needing to calibrate your machine, which is the exact problem I encountered myself! This is especially important if you’re making DIY stickers.
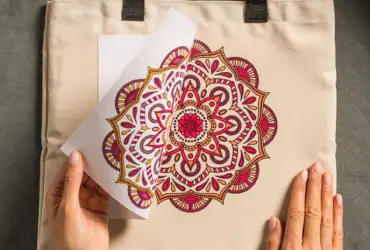
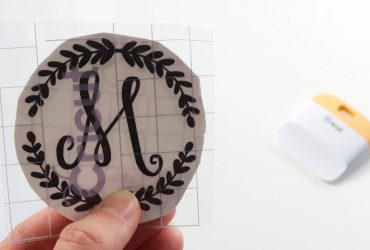
Print Then Cut is an awesome feature in Design Space, which allows you to print out images with your inkjet printer, and then cut out those images with your Cricut Explore, Explore Air, or Maker machine. The goal of Print Then Cut calibration is for your Cricut to precisely cut around the edge of the printed image like you see above.
Print and cut should only be used with white materials, otherwise your blade may not read the cut sensor marks correctly.
Cricut Maker Calibration
If you own a Cricut Maker, you can calibrate your machine for the rotary blade, the knife blade, and for Print Then Cut. You will need to calibrate the rotary blade and the knife blade the first time you use them.
Cricut Design Space will prompt you to calibrate your knife blade the first time you use it, if you have not done so previously. When using the rotary blade, Cricut recommends you calibrate it every time you change it. This will give the best cut accuracy, sizing and alignment possible.

Cricut Explore Air Calibration
Cricut Explore Air machines come pre-calibrated, so you should be able to cut out your Print Then Cut project with no problems. If you find that your machine is not cutting accurately, you can then calibrate your machine. Explore Air or Air 2 machines can only be calibrated for Print Then Cut.
How To Calibrate Rotary Blade
Now I will show you step-by-step how to calibrate the Rotary blade for the Maker (Cricut blade guide here). If using the knife blade or Print Then Cut, select this option instead in Design Space, and continue to follow the on-screen prompts which guide you through the process.
Whichever reason you are calibrating your blade, the process is all very similar and Cricut Design Space does all the work of telling you what to do!
First off, click the lines in the top left corner of Cricut Design Space. This will show your main menu. Click on ‘Calibration’ from the drop-down menu.

Depending on why you need to calibrate your machine, select from the following options. I’m calibrating my rotary blade for a felt flower project, but you can also calibrate your knife blade, or your standard fine point blade for Print Then Cut.

I inserted my rotary blade into Clamp B. Then I placed plain printer paper to be used as my calibration sheet in the top left corner of my StandardGrip cutting mat, as instructed.

I loaded the mat into the machine and clicked the go button.

The rotary blade made a series of cut lines on the printer paper. If you’re calibrating the knife or fine point blade you’ll notice the cuts going from the left and right and connecting in the middle.

Next, I had to select the lines on the paper that overlapped the most and made the nicest single straight line. The answer for this was number 4. The cuts on my printer paper look pretty good!

And that’s it!
The calibration process is complete, and I should get nice accurate cuts from my rotary blade now.

Calibrate Cricut
Like I said, the process for knife blade calibration, and Print Then Cut calibration are very similar. Just follow the instructions and you should have no problems at all!
I hope this post has helped you, and now you know how to get your machine cutting correctly once again!
Here are a couple print and cut projects you might need to calibrate your machine for:
In the mood for some other Cricut tips? Here are 25 great reminders for beginners and pros alike!
(Please note: This post contains affiliate links. Read our full disclosure policy here.)
Similar does not equal same. After informing us that there are 2 different process for calibrating the maker and the air 2 you completely ignore the information for the air 2 and concentrate on the maker specifics exclusively, then claim that the process is similar for the air 2 (but not exact). Why not include the process for the air 2? Or if exclusion was your intent just state at the beginning that only the process for the maker would be covered so the rest of us with the air 2 would not have wasted our time and moved on to an article that actually covered the machine that we are actually using.