
How To Use Avery Transfer Paper
Avery Transfer Paper is the easiest way to start making printed heat transfers!
Using transfer paper gives you a lot more design freedom compared with other heat transfer methods. Screen printing and HTV are good methods in certain circumstances, but using a product like Avery transfer paper allows you to do full color, detailed, photo quality shirt designs!
Avery InkJet Transfer Paper

The great thing about transfer paper? Whatever you can print, you can then press on a shirt!
You are not limited to a few colors or certain types of design – you can do anything. Of course, there is Printable HTV, like Siser EasySubli, but that’s a more advanced product beyond most home crafters.
There are different types of transfer paper for different inks. For example, sublimation paper is for sublimation ink, another paper for plastisol inks, and so on. Avery Transfer Paper is for use with inkjet printers.
What’s so good about Avery Paper?
- Can be applied with an iron
- Print with home inkjet printer
- Don’t need a cutting machine
- For cotton or poly/cotton fabrics
- Free online design software
- Easy to use
- Creates lasting transfers
- Will not crack
These transfer designs do fade over time through use, washing, and drying, but in our experience the transfer has outlived the t shirt.
Avery Transfer Paper Printer

Any inkjet printer should be perfectly fine for printing on Avery Transfer Paper for heat transfers.
We use the Epson WF-2630, but any brand will work, be it Brother, HP, Canon, or an alternative Epson model. If you want some further recommendations, please see these recommended heat transfer printers.
Our main recommendation before printing on Avery paper is to do a print head clean (especially if your printer isn’t used often). This will help prevent any lines or blemishes from occurring, and give you a clearer print.
The other big Avery Transfer Paper tip we have is to set your printer to print on a high quality setting. The default is usually a standard or regular print standard. The high quality setting takes longer to print and uses more ink, but it’s well worth it for a permanent t shirt design you’ll be wearing out-and-about.
Remember, Avery transfers will not work with a laser printer, it needs to be an inkjet printer.
There are two types of Avery transfer paper for t-shirts:
- transfer paper for light fabrics
- transfer paper for dark fabrics
Avery Light Fabric Transfer Paper

Avery Light Fabric Transfer Paper is used for light colored t-shirts and garments. It is a high quality transfer paper that applies accurate, vivid images onto your surface of choice.
This paper is designed for use on light 100% cotton or cotton/poly blends. It can be applied with an ordinary household iron, heat press, or Cricut Easy Press.
How To Use Avery Light Fabric Transfer Paper:
- Create a design in Cricut Design Space or using Avery’s free online software
- Reverse the image so that it will print in reverse
- Print out the reversed image onto the transfer paper with an inkjet printer
- Cut out the image leaving a narrow margin around it
- Place the transfer onto the garment with the image facing down
- Iron directly over the backing paper – up and down, left and right
- Allow to cool for 2 minutes and remove the backing paper
We have a tutorial below on how to make a shirt transfer with this product.
Avery Dark Fabric Transfer Paper

Avery Dark Fabric Transfer Paper is the same type of product as above, but for dark colors.
The transfer paper for dark t-shirts actually lays down a light/white background underneath the image you have printed. This prevents the dark color of the fabric washing out the design. The big difference when printing on dark shirt transfer paper is that you do not need to reverse the image!
How To Use Avery Dark Fabric Transfer Paper:
- Prepare your garment by washing and drying it
- Create a design in Design Space or using Avery’s free templates
- Print out the image the normal way around with an inkjet printer (no need to reverse)
- Cut out the image
- Place transfer onto the garment with the image facing up
- Place tissue paper (comes in the pack) over transfer
- Iron transfer – up and down, left and right
- Allow to cool for 2-3 minutes and slowly peel away the tissue paper
If you want to see full step-by-step instructions on how to make a shirt using Avery Dark Transfer Paper, please see this t shirt clipart project!
Avery Fabric Transfer Paper Tutorial

A lot of people want to know if they need to use a specific software when using a product like Avery Transfer Paper. Avery have a set of free templates on their website that you can use to create your design and perfect your image.
Visit Avery’s Template page to set up an account and begin designing. It is very easy to use and you’ll have the hang of it in no time. Their online software also allows you to mirror or reverse your image before printing, which you will need to do if you are using the transfer paper for light fabrics.
If you have a Cricut machine, you can also use Cricut Design Space to customize, print, and cut out your design. We’ll show how to do that now.
Upload your clipart of choice in PNG format to Design Space. This LOVE design can be found here. Mark it as a complex image, and then use the eraser tool to delete the outline of the graphic. Once that’s done, save it as a print and cut.
Bring the image into a new project and then work out how big you want the finished print to be. Once done, click ‘Make It’!

You will see the mat preview on the next screen.
Because we’re using Avery Light Fabric Transfer Paper, we need to mirror the mat. The printed transfer will be applied face-down and appear right way up. If it doesn’t matter which way your image is applied this isn’t super important, but if you have text in the design it sure is!

Next, send the design to the printer, and make sure the bleed is OFF – unless you have a contour cutting machine.
You don’t need a cutting machine to complete this project, it’s totally fine to cut out the finished transfer with scissors, but you can use one if you like! Check out this Cricut Print and Cut project for more info on how to use your machine to do the cutting!

Now we can cut the image out. It does not need to be a perfect cut because it’s a white background being applied to a white shirt. No one will see where the transfer ends and the shirt begins!

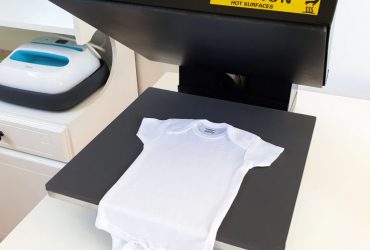
Now we’re ready to apply the Avery heat transfer!

I’m using the Cricut EasyPress to apply this transfer, but the instructions for using an iron were listed up above.
Here are my EasyPress settings:
- 340ºF
- press for about 60 seconds

We’re pressing on top of an EasyPress Mat to protect the table underneath.
First up, pre-press the tee to remove moisture and wrinkles!

Once the shirt has cooled down, set the heat transfer on the shirt colored-side down.

Time to heat press with firm pressure for 60 seconds over each part of the transfer!

Avery Transfer Paper is cold peel, so you must wait for it to totally cool down before peeling away the backing paper.

And this is the completed project!

That’s how to use Avery heat transfer paper. See this project we shared on Creative Fabrica for complete instructions!
It’s so easy, but the results are amazing. It definitely looks like it should be harder than it is!
(Please note: This post contains affiliate links. Read our full disclosure policy here.)
![NEW SawGrass Sublimation Printer Guide [UPDATED 2025]](https://www.howtoheatpress.com/wp-content/uploads/bfi_thumb/sawgrass-sg-500-review-3ahav4baamjdryo191c6bu.jpg)
I am using an iron to put my transfers on, but they all turned out wrinkly. I found that if I press the iron and move it quickly on the wrinkly patches, it seems to get rid of the wrinkles a bit, so I kept trying to get rid of the wrinkles, but they wouldn’t go away, and now the transfer isn’t sticking. Help!
Hi Elyssa, sorry the transfer is giving you trouble. Too much heat can cause the transfer not to stick which may be what happened when you kept trying to get rid of the wrinkles. Did you wash the garment first? Sometimes the shrinkage of the clothing item can cause the transfer to look wrinkled.
Printing on front and back of fabric
Im making some prayer flags and i was wondering how if i place an image on the front and back of fabric at the same time and then apply the heat. Or should i do front and back separately?
This sounds like an interesting project, Alexis! I would suggest you apply each side with just a tack (a few seconds with the heat press) and then once both sides are on do a full press. You don’t want to fully press each side separately as whichever of your sides you do first will be exposed to too much heat.
60%poly 40% cotton…
Hi, I have a hoodie that is 60%poly 40% cotton, can I use this to transfer on to with Avery paper? I want to use a mix of tye light and dark paper as some I want transparent and others images need a white background. It a great hoody.
Many thanks
B
Wow, that sounds like a great project, B! You can definitely use Avery Transfer Paper on a 60/40 poly/cotton blend hoodie. Good luck with the design, it sounds really interesting being part transparent and part opaque!
Can you use the scraps to print more than one image? Or do you have to use a new sheet for every print?
Hey Amanda – you can’t use scraps to print because I don’t think they’ll feed through your printer.
I have tried this on 3 different shirts and everyone has ripped putting it on for the first time. I use a household iron set on cotton/highest setting. Help
Oh no, Sarah! I’m sorry your designs are ripping. One thing that may be contributing is the heat of the iron. Cotton iron settings are approximately 400 degrees which might be too hot. I know that’s annoying because the transfer says to use the cotton setting. I’d turn it down to the wool or rayon settings that are a bit cooler. They’re not really designed to stretch much so it may also be worth using larger garments that don’t deal with as much tug when putting them on. Lastly, smaller designs are always going to stick better and last longer. I hope something helps!
I’m bought light color transfer paper #3271. My question is ; When I heat press the design over the t-Shirt, ( I know I need to crop) Only the ink stayed and the glue- look like part comes off or the ink stays with the glue-look like stayed ??? I hope you can understand me…
Hi there Nancy, I think I understand. The part you’re calling the glue-look like will get printed onto the shirt. It’s pretty transparent but you’ll notice it. That’s why you need to either use a cutting machine or do some detailed scissor work to cut out just the design elements you want on the shirt. Hope that helps!
Thanks for sharing your experience. I really appreciate it to you.
You’re so welcome!
Hi.
I am trying to transfer an A4 image onto a T-shirt, and following the instructions for the Avery transfer, I ironed it for 3 minutes. After leaving it for 30 or 40 minutes to cool I tried to take the backing off. Some of it partially peeled off, leaving a thin layer of the paper on the shirt
The instructions were clear enough, 3 minutes for an A4 image.
The question are, was 3 minutes to long?
Will the thin layer of the transfer paper come of by washing?
Hey Ted – I’m not sure if three minutes was too long. I’ve heard that heating it again and allowing it to cool a bit but still be slightly warm can make it easier to peel. As for the thin layer maybe you could try getting it a little damp and seeing if it will peel off that way. Hope something works out for you!
Hi.
I’m trying to use the Avery light transfer paper. I’m using a heatpress. Do I mirror the image and heatpress then peel the backing off after it’s pressed or peel the backing off before I heatpress? What temperature and time should I set the heatpress for?
Hi Amy! Yes, your image will need to be mirrored. If you’re using Avery’s software to design it they’ll do it for you automatically but if you’re using Cricut Design Space you’ll need to mirror the image before printing. Make sure you trim any excess paper around your design before pressing! For the heat press – Avery says cotton setting on a regular iron which is 400 degrees. That’s pretty hot and a heat press is so much more efficient than an iron. We recommend 320 degrees and pressing for 20 seconds. Add a sheet of parchment paper or teflon between your design and the heat press to protect your garment. Make sure to let your garment cool and then you can peel off the backing. Hope that helps and you get great results!
Hello, everyone, I’m getting very frustrated, but not trying to give up. So i got an heat press machine, i had tried different method to getting the image to stick to shirt, I have tried 30 secs, to 1 min to 3 mins and 6 mins, each time it never stuck to the shirt. Please help, Am I missing something? Temp is set to 355 at 30 sec, and I’m waiting about 3-5 mins to cool down before I peel off. Please help me before I give up. Any suggestions?
Hi Curtrina – that sounds crazy frustrating! I’m sorry you’re having trouble getting your image to stick to your shirt. Can I ask what material the shirt is? Avery transfer paper works best on 100% cottons so if you’re working with a polyester shirt that could be the issue. Has it been washed? Washing and drying on whatever temp it’ll typically be washed on is always a good way to make sure your design will stick better and stay on longer. Hopefully one of those things helps you out – hang in there, it can take a bit but once you get a shirt to turn out you’ll be hooked!
I use a large heat press and keep getting scorching or burning with my dark fabric transfers. I did have the heat at 375 for 45 seconds. I’m assuming too hot and too long. What is proper temp and time ?
Hey there, Paige. Sorry to hear you’ve got some scorching going on! That can happen more easily, and is certainly more noticeable, with dark fabrics in my experience. Your heat press is much more efficient at applying pressure uniformly than an iron so I’d definitely cut down on the time you press for – start with just 15 seconds and press for an additional 5 if need be. The temp at 375 should be alright. You probably already are but make sure you’re using a sheet of parchment paper or a teflon sheet to help protect the fabric. Hope that helps and that your future shirts turn out nicely!
Congratulations, I wish you continued success.
Thanks, Aviva! Looks like Yandex has some nice heat pressing products available!
My heat press goes to 320 degrees, how long should I press and leave the transfer paper on the Tshirts?
We’d recommend 60 seconds and then make sure to wait for it to cool down before peeling. Good luck!
Thanks for sharing this step by step detailed guide. This is best for beginners.
You’re welcome, Ozmen! So glad you found it helpful.
After reading these comments I was super nervous to attempt!
BUT I can say with 100% confidence if you are using a heat press, that 350 at 20 seconds, wait to cool and then peel (it can be hard to get at the edge) WORKS PERFECT!
Thank you, Jessica!
I tried using this one a piece of untreated pine with a heat press at 305°F for 30 seconds and 300° for 40 seconds, both times did a hot peel off and both times it felt like glue was left on my board. What was I doing wrong?
Hey Kaylee, sorry to hear it was giving you trouble! Was the residue outside of the design area? Maybe you just needed to cut out your design carefully beforehand. Would a coat of varnish on top get rid of the glue? Let me know if you have got any other questions, hope that one of those ideas helps!
Avery lights same problems..had a hard time peeling it off the shirt.Im using a heat press 340 for 40 sec… The directions were horrible ..Each sheet has directions but No temp and time. I’m having to search for better directions.
Hi Kawana, sorry you’re having trouble. Avery live chat might be a helpful option for this!
I tried this today with a heat press, medium pressure, 350 degrees for 20 seconds. The transfer wouldn’t come off. So I tried a second shirt for 10 seconds. It was perfect. I was able to salvage the first one by putting it in the heat press again for a few seconds. I was able to peel it off. Looks good, we’ll see how long it lasts.
mines crack within a minute of me stretching with a heat press
Sorry to hear that – stretchable transfer paper might be a better product if stretching is an issue.
I used 50% poly and 50 % cotton and put heated them at 350 for 50 seconds kind of heavy pressure and let them sit for 7 minutes and they peeled off pretty well. I didn’t realize this type of paper left a hard film on the actual shirt, but we will see how they turn out after a wash. But the transfer came out good and no peeling problems.
Thanks for the comment Kenneth – yes it is quite a thick transfer when all is said and done. The Avery Transfers that I have pressed have lasted a long time – I’d say some of them have been washed 20-30 times without any peeling or cracking. I think some of them might have faded a bit, probably from being dried in the sun.
Could you use the transfers on can koozies? If so, what temperature should the heat press be on and for how long?
Hi Laura, I haven’t tried this myself, but I would say the Avery stretchable transfer paper would be better for this. Time and temp will depend on whether you are using light or dark transfer paper, and the material your Koozie is made of, therefore I suggest you use the Avery live chat support to get the best advice!
Heat press vs easy press for cost and durability. Which one is more cost effective.
Hi June, it really depends on what size your after. Generally speaking, the EasyPress is a bit cheaper (unless you get the large one) and it will be very durable/long lasting. The cheaper heat press machines are not always as reliable – the MPress is one of the best entry level options. Check out this post for a bit more info on how to choose a good heat press.
I’m using pen + gear fabric transfer paper. Would you be able to help me with the temperature & time for dark fabric using heatpress
Hey there, I hadn’t personally come across that brand myself (but found it on Walmart just now). It’s going to depend on whether you are using a heat press, iron, or EasyPress. If heat press try 340 for 40 seconds, if an iron you’ll likely need to run the iron (set to cotton) over the transfer for a minute or more. Appropriate instructions for your brand should be on the pack though.
I do not have an iron, I only have a heat press, I tried 3 shirts of 100% cotton and I have no results, the paper of the image is not peeled, to know if I am doing something bad, what time should I leave it and at what temperature?
thank you very much for your help
Hi Carlos, a heat press is fine for these transfers; I’ve used mine plenty of times. Just follow the instructions on the back of the pack and you can’t go wrong. I’m not sure if you’re using the transfer paper for dark or light tees, but the methods for applying each are different. You might be using the wrong set of instructions for the transfer you are pressing. The other possible problem is that you are not letting the transfer cool afterwards. It is cold peel and needs to be left for two minutes.
Hello again, I still have problems, the paper I have is “light fabric transfer”, the indications are not very precise with respect to the temperature, I have white cotton shirts, I follow the instructions as it should be, but at the moment of removing the paper, it does not come out completely, it comes out like a layer of paper, it is stuck on the garment, of the 7 pieces that I have only one left and with difficulty, very different to their videos, for fear, it could be more specific with respect to the pressure of the heat press, temperature and time, I would be very grateful.
regards
I would try 350°F for 20 seconds. Remember to pre-press the garment, and cold peel the transfer. If that doesn’t work, it might be a problem with the transfer paper itself.
We also had trouble like this recently and it seemed to be a bad batch of paper (we’ve been doing this for 30 years with no problem). New batch of paper fixed the problem.
350 degrees for 20 seconds seems to work for us, with a decent amount of pressure (I know that’s vague, but our press doesn’t give anything specific for the pressure setting).
I am having same problem .. and if I press longer or at cotton setting on iron vs easypress then the paper sticks to fabric
I used an easy press with recommended settings (340 for 50 seconds) the transfer isn’t sticking to my shirt at all. Any suggestions?
Hi Lynn, I’m not sure what’s going wrong, sorry! It should work. You can see an Avery Transfer Paper project I made here. I used those same setting with the EasyPress and got really good results. The t-shirt has been washed and worn at least a dozen times and is showing no signs of peeling or deterioration. What is the fabric make-up of the t-shirt you are attempting to put the transfer onto?
Can you use photo printer
Hi Theresa, not totally sure what you’re referring to sorry. Yes you can print photos if that’s what you mean.
What temperature should I use when applying with a heat press? I made one and it cracked the first time it was worn.
I press mine at 340 degrees and haven’t had that happen. What temp did you have your machine set to?
What pressure and press time do you recommend?
Hi Robert, if you’re using an Easypress with iron on transfer paper I’d go 340 degrees for 50 seconds. With an iron it will need a bit longer, and you set it to cotton. More instructions from Avery here.