
Cricut Patterned Iron On Project – How To Cut & Press
We’re testing out Cricut Patterned Iron On!
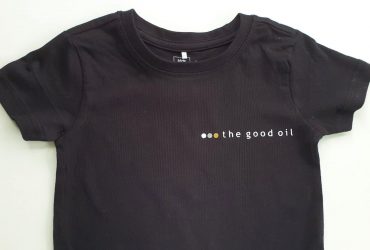
For this project I designed my first ever SVG! A dress SVG especially for the In Bloom Pink Sampler. I wanted to use the three patterned iron on sheets in one design, and I added a little Glitter Iron On to finish it off.
While the design is a little clunky, I hope it gives you some Cricut patterned iron on project ideas!
How To Use Patterned Heat Transfer Vinyl

In my opinion, it’s better to use patterned iron on vinyl with large images, silhouettes (like animal shapes for example), or chunky text, which will really show off the pattern. After all, it’ so pretty, you might as well make sure it’s going to be seen well!

Cricut Patterned HTV can be cut with all vinyl cutting machines, and pressed with:
- an iron
- the EasyPress
- or a heat press
You will see the tools I use throughout the post, and you can find out more about other brands of patterned heat transfer vinyl here.
Patterned Iron On Vinyl Design
Here’s the design I’ve made for this project. If you want, you can download the free SVG cut file at the end of this post!
Otherwise, take a look at these Free SVGs for Cricut, or perhaps a Disney SVG would work well with patterned vinyl?
I’ve made my design six inches wide for a two year old’s t-shirt – resize to fit your garment.

Cricut Patterned Iron On Instructions
Here’s the iron-on that I’m using for this project.
As mentioned above, I’m using the In Bloom Pink Sampler, and Siser Glitter HTV (for the sash).

Because I’m using 2 different types of vinyl, they each have different cut and application settings. It’s important to check out the recommended settings before you start cutting and pressing.
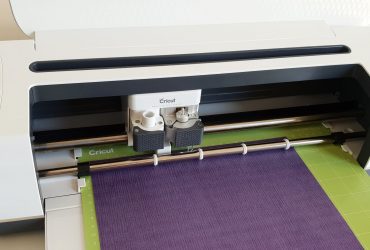
I’m cutting this project out on four mats for the four different vinyls, using the Explore Air 2.
The first mat is cutting out part of the design in patterned iron on. I set my dial to ‘custom’ and selected patterned iron on from the custom settings.
The glitter HTV part of my design is my second mat, so I made sure to change the custom settings to glitter iron on, and then back to patterned iron on for my third (and fourth) mat.
If you are using the Cricut Maker, you will select ‘Patterned Iron On’ in Design Space before the job is sent to the machine.

How To Cut Patterned HTV On Cricut
Place the HTV onto the cutting mat with the shiny side (pattern side) facing down; this goes for both the patterned and glitter HTV.

Before clicking cut, make sure you mirror ALL mats (it is an easy thing to forget!) so that the design is cut in reverse.

Next I weeded each part of my design and removed all of the excess vinyl.
Cricut Patterned iron on is incredibly easy to weed – there’s no resistance at all! It’s by far the easiest type of vinyl I’ve had to weed.
It is also quite nice that the carrier sheet isn’t sticky like most other HTV (one reason it’s easier to weed).

How To Heat Press Pattern Iron On
I’m using the original Cricut EasyPress to apply the patterned HTV design. The settings are the same for the EasyPress 2.
For patterned iron on, set the temperature to 340°F allow the machine to heat up. It’s really quick to reach temperature, only taking a couple of minutes (My heat press takes at least 10-15 minutes)!

I’m using a silicon pad to press on with my EasyPress.
We purchased the silicon pad rather than the EasyPress mat, because the latter didn’t ship to my address at the time. While there isn’t a lot of difference, the EasyPress mat is probably the better choice!

I pre-pressed my garment for five seconds to remove wrinkles and moisture from the shirt.

I put my design together and worked out exactly where I wanted it to be on the shirt.
I’m going to press one part at a time, as I need the placement to be perfect. I decided to start with the biggest part of the dress first, and removed all the other parts I’m not pressing yet.

Cricut recommends pressing the patterned iron on for 30 seconds and then turning the garment over (without removing the carrier sheet) and pressing from the back for another 15 seconds.
Patterned iron on vinyl should be peeled cold.
I pressed the main skirt part first, and then the two layers of ruffles.
As the different parts of the skirt were going to be pressed multiple times, I didn’t do the full 30 seconds in one go. This is the same as when layering heat transfer vinyl.
Instead, I did about 10 seconds on the skirt, 10 seconds on the first ruffle, and another ten seconds on the second ruffle. Then I gave both ruffles another 10-15 seconds (I pressed everything from the back when I had completely finished the dress).
It’s important to cover up any part of the design you’ve already pressed with the carrier sheet. This will protect it from the press so that it won’t melt.

Using Different Types Of Vinyl On The Same Shirt
The next part of my design is the sash of the dress in Siser glitter HTV. I lowered the temperature of my EasyPress to 320°F. Siser recommends using firm pressure for 15-20 seconds for applying glitter.
Glitter HTV is ONLY a top layer, as well as Cricut Patterned Iron On. These vinyls must not overlap at all, otherwise they won’t adhere properly – they won’t have anything to stick to!
I placed the glitter HTV right next to the patterned HTV, but made sure they weren’t actually touching.

For the final part (the upper patterned section of the dress), I changed the temperature on my EasyPress back to 340°F.
I replaced the carrier sheet over the rest of the dress to protect it, and pressed only the top area for the full 30 seconds.
Once the design was all pressed, I turned the garment over and pressed it from the back for 15 seconds.
Patterned Iron On Project
The EasyPress is just that – easy to press with!
There’s no learning curve involved at all – you just turn it on, set your temperature and time, and you’re good to go. The timer counts down and then it beeps to let you know the time’s up. It’s so simple! Though if you’re keen, we’ve got some EasyPress tips here.

I love how pretty this looks. Such a cute addition to my two year old’s wardrobe!
Free Patterned Images For Cricut
As promised, here is the free SVG cut file I designed for this project! Click the download button below for use in Cricut Design Space (and any other program that accepts SVG files).

If you use the cut file, I’d love to hear (and even see) what you use it on – tag us on social media or let us know in the comments below.
Thanks for visiting! Pin this project for later!
(Please note: This post contains affiliate links. Read our full disclosure policy here.)
I am thankful for your tutorial, Cricut’s tutorial confused me with the kiss cut info, I don’t find that necessary. I am using Patterned Iron on Vinyl for the first time for 2 projects, I hope they come out as well as yours did.
I’m so glad you found our tutorial helpful, Linda! That’s great, and I bet your project turned out beautiful.